As a mix engineer, one of the most common frustrations I hear from music producers is struggling to get the vocals to properly sit in the mix. Despite their best efforts at EQ'ing, compressing, and adding effects, the vocals end up either getting buried underneath the instrumentation or poking out awkwardly above the mix.
Achieving that sweet spot where the vocals blend seamlessly into a balanced mix can seem incredibly elusive at times. The key is having a comprehensive approach that addresses vocal placement at every stage - from performance to processing.
Here is a key takeaways table summarizing some of the main vocal placement techniques covered in the article:
| Technique | Description |
|---|---|
| Bring Up Fader | Simply raising the lead vocal fader level to make it cut through the mix better |
| Automate Smooth Volume Envelopes | Use automation to create smoothed out vocal volume rides that enhance clarity and balance |
| Compression | Controlling the vocal dynamics using compression for more consistent audibility and projection |
| Limiting | Use automation to create smoothed-out vocal volume rides that enhance clarity and balance |
| Strategic Equalization | Carefully boosting or attenuating EQ bands to carve space for the vocals or enhance presence |
| Reverb & Delay Processing | Using reverb, delay and modulation effects to create space and room for the vocals to shine |
| Parallel Compression | Compressing a duplicated vocal for thickness then blending it beneath original for clarity |
| Multiband Dynamics Control | Compressing a duplicated vocal for thickness then blending it beneath the original for clarity |
| Sidechain Volume Ducking | Duck instrument levels beneath the vocals using sidechain compression for prominence |
Understanding Vocal Placement in the Mix
Before we jump into the processing techniques, it's crucial we establish a common vocabulary when discussing vocal placement.
The phrase "sit in the mix" refers to how clearly the vocals can be heard in the context of all the instrumentation and how well they blend with the other elements. The vocals need to have enough presence and clarity to be intelligible, connect with listeners emotionally, and tell the story. At the same time, they shouldn't obnoxiously stick out above the other parts.
This balance depends greatly on the frequency spectrum - the range of bass, low, mid and high frequencies that comprise any audio signal. The whole mix occupies a similar frequency spectrum, with each instrument staking out certain ranges.
Vocals predominantly occupy the mid-range, roughly 300 Hz to 3 kHz, which is why they commonly compete for space with instruments like guitars, pianos, and cymbals. The relationship between the vocal frequencies and the rest of the arrangement frequencies greatly impacts the vocal balance.
Additionally, every genre has certain conventions for the desired vocal sound, loudness, effects, and prominence. As mix engineers, it's our job to deliver mixes that meet the stylistic expectations. So constantly listening to professional reference tracks is crucial.
With this foundation established, let's explore some solutions to address vocal placement. We'll start with some simple non-processing techniques before getting into EQ, compression, effects, and advanced methods.
Non-Processing Solutions for Vocal Placement
You don't always need to reach for an EQ or compressor to adjust vocal placement in your mixes. Some very simple fader and volume moves can work wonders. Let's look at two easy techniques - bringing up the vocal fader and fader automation.
The "Bring Up Fader" Technique
One of the most deceptively powerful yet underutilized solutions to getting the vocals to cut through the mix is... drum rolls ...just turning them up!
I can't tell you how often the answer is staring me plainly in the face - the vocal fader just needs to come up. This takes advantage of the natural tendency we have to focus our listening attention on whatever is the loudest element. Simple yet incredibly effective!

Some caveats though - don't overdo it to the point that the vocal sounds strangely disconnected from the rest of the mix or gets overly fatiguing/harsh. The key is finding the right balance between vocal loudness and instrumentation loudness to achieve clarity without abrasiveness.
The "Ride The Fader" Technique
The power of a manual fader approach is undeniable, but we live in the digital age! For the ultimate precision in transparently smoothing out vocal dynamics, it's hard to beat automation.
With most DAWs nowadays, automating mixer moves like volume rides is simple. You likely already know the basic process - activate automation on the vocal track, press record, and manually draw a volume line that ducks down on loud words and brings back up quiet words.
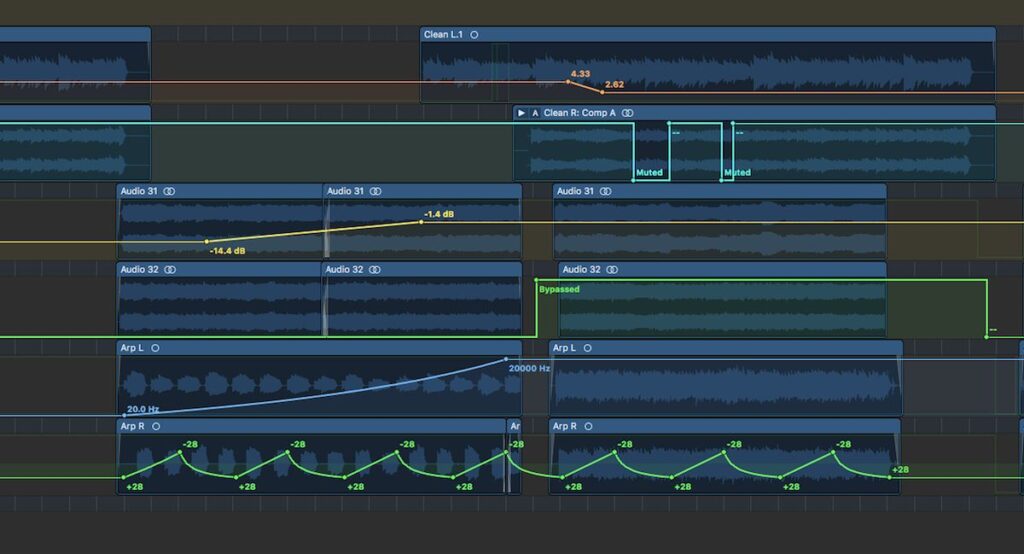
But automation offers even more advanced functionality nowadays like:
- Write Modes: Choices for how newly written automation passes interact with existing passes. This prevents overwriting.
- Relative Adjustment: Change existing automation without fully replacing it. Maintain the contour shape while globally tweaking levels.
- Presets: Save your painstakingly crafted automation rides as presets for consistent reuse across projects
Don't be afraid to geek out and take your automation to the next level! Things like grouping tracks can allow you to efficiently write identical automation across backups and harmonies. The creative options blossom exponentially.
With all this power and versatility, automation unlocks a profound dimension of transparent and nuanced vocal dynamics control. Implementing techniques like carefully smoothed volume envelope shaping makes getting flawless vocal placement much more achievable for us mix engineers. Who needs compressors? Okay maybe not, but you get the idea!
Dynamics Processing Solutions for Vocal Placement
Volume moves only get us so far though. To truly grab hold of vocal dynamics, we need to bring in the big guns of dynamics processing - compression and limiting. Let's break these down.
Compression For Consistent Vocal Levels

A compressor works by reducing the dynamic range between the loudest and quietest signal levels. With respect to vocals, this means clamping down on loud words so they don't jump out, while boosting the level of quiet words so they don't get buried.
When optimized effectively for the unique dynamics of a vocal performance, a compressor evens out fader movements to keep hot spots tamed and quiet spots audible. The result is excellent vocal clarity and consistent projection throughout, allowing the voice to seamlessly blend amidst dense arrangements.
The key is dialing in the perfect attack, release, ratio, and threshold settings to transparently control vocal dynamics without excessive coloration or audible compression artifacts. This requires some thoughtful fine-tuning by ear, but it’s worth it!
For more information about Compression check out our What does a compressor do? Guide.
Limiting For Preventing Peaks
A limiter is essentially just an aggressive compressor focused specifically on catching and controlling peak signal levels beyond a defined ceiling.
Where a compressor smooths out gentle and moderate dynamic variations across a wide threshold range, a limiter zooms in on only the very loudest peaks and makes sure they never breach past the target ceiling level.
This is incredibly useful as a final protection stage for catching any surprise vocal pops that managed to slip past other processing. Limiting prevents these pesky peaks from masking elements like guitars and keys, allowing the entire vocal performance to comfortably sit underneath the target ceiling.
When used sparingly with care just to control peaks, a limiter can provide transparent assistance in securing vocal placement amidst dense mixes. Combine it with tasteful compression prior, and you have complete dynamic control!
Equalization Solutions for Vocal Placement
Alright, you knew we had to get into EQ at some point! No discussion of dialing in mixes or addressing vocal placement would be complete without equalization.
While volume moves and compression focus on loudness consistency and dynamics control, EQ targets the tonality and frequencies comprising the actual sound itself. Let's explore some key techniques.
Boosting Presence Frequencies
The mid-range frequency spectrum from around 300 Hz all the way up to 8 kHz is hugely important for the clarity and projection of vocals. Boosting frequencies in this zone with gentle EQ boosts can work wonders for bringing vocals forward and enhancing intelligibility amidst busy arrangements.
The key when applying EQ is restraint. It's tempting to aggressively scoop massive chunks of frequencies in pursuit of loudness and presence. But this destroys tonal balance and introduces nasty resonant peaks.
Let your ears, not visual EQ curves guide you. Meticulously sweep frequencies listening for the special spots where the smallest possible boost brings out the most engaging vocal texture. Precision and nuance are paramount when EQ'ing vocals amidst mixes!
In particular, two sweet spots I regularly target are:
- 3-5 kHz Range: Gentle boosts between 3 kHz to 5 kHz add top-end sheen and radiance, allowing the vocals to cut through a mix clearly without getting shrill. The exact peak center frequency will differ for every unique voice.
- 200-500 Hz Range: Subtle boosts down in this lower mid-range zone contributes solidity and projection power to voices, preventing them from sounding wispy or distant. But don't overdo it, as it's easy to muddy up the clarity.
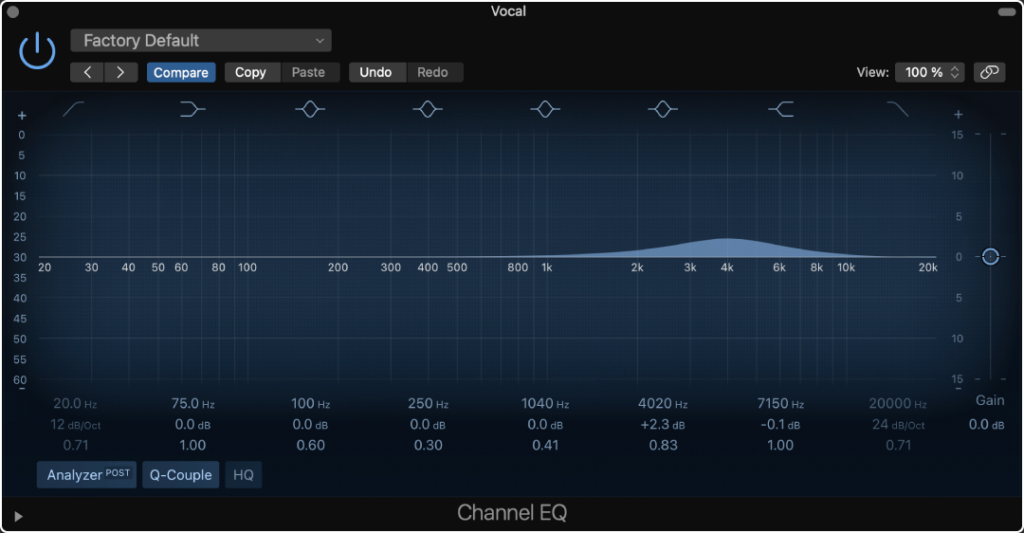
When boosting frequencies like this, it's easy to get overzealous. I always advise boosting minimally in small increments - better to slightly enhance presence than to drastically scoop and introduce nasal harshness or thin telephony-sounding tones. Moderation is key!
The right targeted EQ moves provide tone-shaping magic while volume rides, compression, and limiting handle the macro dynamics. Just be careful not to overuse EQ and sap all the life out of the vocal in pursuit of loudness and projection. Naturalness must be preserved!
For more information on vocal EQing, you might also be interested in checking out our guide on How to EQ Vocals. This guide will give you a lot more detail on how to get a good vocal sound using EQ.
Effects Solutions for Vocal Placement
Alright, we have covered a lot regarding fundamental ways to address vocal placement amidst instrumental arrangements. Now let's spice things up with some effects processing! Reverb and delay lend crucial depth, space, and dimension to vocals.
Reducing Reverb While Adding Delay
A common mistake is overdoing reverb on the lead vocal in an attempt to make it sound bigger. Too much reverb, however, tends to push sounds farther away into the background.
Instead, try reducing reverb on the lead vocal slightly while adding more delay and potentially reverb on the backing instrumentation. This keeps the lead vocal upfront and present while carving out space for it to prominently occupy amidst a lush spacious mix.
When adding delay, it's advisable to tune it to the song tempo to prevent vocal doubling effects from clashing rhythmically with the groove. Getting the delay mix just right can take some careful tweaking but the impact on vocal placement is massive.
Always remember to customize effects settings like reverb type, time, early reflections level, and pre-delay specifically for optimizing vocal clarity while gluing them into the instrumental arrangement. Don't just slap on presets!
Common Vocal Placement Issues and Troubleshooting
Even with this comprehensive toolkit, you will likely still encounter mixes where the lead vocals still don't seem to properly blend amidst the instrumentation. Let's break down some common challenges:
- Masking - The vocals get buried underneath louder mid-heavy instruments like pianos, guitars etc. Troubleshoot by carving space via subtractive EQ on those instruments.
- Harshness - Over-boosted presence frequencies make vocals sound sharp, nasal and fatiguing over time. Troubleshoot by identifying the exact resonating frequency and attenuate it.
- Muddiness - Excessive low-mid buildup robs vocals of clarity and intelligibility. Troubleshoot with high-pass filtering below 200 Hz to clean up the mud.
The key is always carefully listening - don't just reactively grab an EQ and start slicing frequencies. Train your ears to pinpoint exact problematic frequencies first, then surgically target them. This prevents over-processing.
Advanced Vocal Placement Techniques
Finally, once you have tightened up fundamentals like volume rides, compression, EQ etc, we can explore taking vocal processing to the next level with some advanced tricks. Let's check out parallel compression, multiband compression, and sidechain compression techniques.
Parallel Compression
This ingenious approach involves sending the lead vocal to two channels - one completely dry, and the other heavily compressed and mixed subtly back in.

The compressed channel thickness and intensity of the vocal presence, allowing it to cut through dense mixes with aggression and attitude. Blending it back subtly retains the clarity. This best-of-both-worlds processing can yield outstanding results!
Multiband Compression
Instead of compressing the entire vocal as one, multiband compression splits it into separate frequency bands - lows, mids, highs - and compresses each band separately.
This allows precision dynamic control. For example, we could heavily compress the lows to prevent muddiness, gently compress the mids, and leave the airy presence highs uncompressed. This optimizes vocal clarity and intelligibility amidst arrangements.
Sidechain Compression
Pumping effect sidechain compression applies volume ducking to sounds when vocals enter. For example, gently ducking guitar levels beneath the vocal gives it space to shine through every time words are sung.
When optimized musically to the groove, sidechain compression provides mix-wide dynamic control led by the vocals. This creates the quintessential pop/dance music effect of vocals commanding center stage while instrumentation pulsates around them.
Conclusion
And there you have it folks - a fully packed vocal placement processing playbook. We've covered fundamental dynamics tools, tone shaping with EQ, lush effects, fixing common problems, all the way to creative advanced routing ideas.
The key is realizing vocal mixing requires a holistic approach addressing every aspect, from technical dynamics management with compression to stylistic gluing into arrangements with delays. Master these concepts with some rigorous practice on different material, and your vocal mixing abilities will rapidly improve.
I hope this guide has provided you with a useful framework of ideas to experiment with. Now get mixing those vocals!