

When it comes to professional vocal production, EQ (equalization) plays a crucial role in achieving a polished and captivating sound. EQing vocals is a skill that every recording and mixing engineer should master to enhance vocal clarity and presence in a mix. By using EQ techniques, you can shape the frequency response of the vocals, addressing specific issues and bringing out the best qualities of the voice.
The Role of Proper EQing in Vocal Production
EQing vocals involves the strategic adjustment of frequency bands to achieve a balanced and pleasing sound. It allows you to sculpt the tonal characteristics of the vocals, removing unwanted elements, reducing muddiness and boominess, and adding brightness and clarity. By properly EQing vocals, you can create a sense of air and sparkle, making the vocals stand out in the mix without overpowering other elements.
Understanding EQ Basics
What is EQ and how does it work?
Equalization, commonly known as EQ, is a fundamental tool in the world of audio production and mixing. It allows you to manipulate the frequency content of a sound, including vocals, to achieve a desired tonal balance. EQ works by boosting or cutting specific frequency ranges to shape the sound according to your preferences.
Frequency bands and their impact on vocals
Understanding the frequency bands and their impact on vocals is crucial for effective EQing. Here are the main frequency ranges and their characteristics:
- Low-end bass frequencies (20 Hz - 250 Hz): These frequencies provide the foundation and body of the vocals. Careful EQ adjustments in this range can help remove muddiness and excessive bass, creating a cleaner and more defined vocal sound.
- Low-mid frequencies (250 Hz - 500 Hz): The low-mid range affects the warmth and thickness of vocals. Reducing mud and boxiness in this area can help achieve a clearer and more balanced vocal tone.
- Mid-range frequencies (500 Hz - 2 kHz): The mid-range is often considered the core frequencies of vocals, where the intelligibility and presence of the voice reside. Balancing these frequencies is essential for a natural and upfront vocal sound.
- High-mid frequencies (2 kHz - 4 kHz): Boosting or cutting in this range can add clarity, articulation, and presence to the vocals. However, excessive boosting can lead to harshness or sibilance, which might require further corrective measures.
- High frequencies (4 kHz and above): Boosting or enhancing the high frequencies can add air, sparkle, and detail to the vocals, making them more vibrant and present in the mix. Care should be taken not to overemphasize this range to avoid harshness or unwanted artifacts.
Understanding these frequency bands and their impact on vocals will allow you to make more informed EQ decisions when working on vocal recordings and mixes.
Preparing for EQing Vocals
When it comes to achieving professional-sounding vocals, proper preparation is key. In this section, we will explore essential steps to take before diving into the EQing process. By setting up your recording environment, selecting the right microphone, and employing effective recording techniques, you can minimize the need for excessive EQing and lay the foundation for exceptional vocal tracks.
Properly setting up your recording environment
Creating an ideal recording environment is crucial for capturing clean and high-quality vocal recordings. Consider the following factors when setting up your recording space:
- Acoustics: Take into account the room's acoustic characteristics and aim to minimize unwanted reflections or resonances. Adding acoustic panels or diffusers can help optimize the sound in the space.
- Room treatment: Properly treating the room can significantly improve the recording quality. Consider using bass traps, diffusers, and absorbers to control the sound reflections and minimize unwanted noise.
- Visual analysis: Utilize tools like spectrum analyzers or frequency waveforms to visually assess the frequency response of your recording environment. This can help identify any problem areas that may require additional treatment.
Choosing the right microphone and microphone placement
The choice of microphone and its placement play a crucial role in capturing the desired vocal sound. It's important to remember that the tone and the character of the vocal sound are decided in the recording phase. Consider the following factors when selecting a microphone and determining its placement:
- Recording goals: Define the sonic characteristics you aim to achieve. Different microphones have unique frequency responses, polar patterns, and sonic qualities that can enhance specific vocal qualities.
- Microphone types: There are various types of microphones available, such as dynamic, condenser, and ribbon microphones. Each type has its own strengths and characteristics, so choose the one that best suits your vocal style and recording environment. For example, if you want a warm vocal sound, then you may want to use a dynamic mic and get close to it (2-5 inches). If you want a more open and natural-sounding vocal you may want to pick a condenser microphone and get further away from the mic (5-10 inches).
- Polar patterns: Consider the polar pattern of the microphone, which determines its sensitivity to sound from different directions. Cardioid patterns are commonly used for vocals as they focus on capturing sound from the front while minimizing background noise.
- Proximity effect: Take advantage of the proximity effect, which refers to the increase in bass response when the vocalist is closer to the microphone. This can add warmth and depth to the vocals.
Recording techniques to minimize the need for excessive EQing
Employing effective recording techniques can greatly reduce the need for excessive EQing in post-production. Here are some techniques to consider:
- Mic positioning: Experiment with different microphone positions to find the sweet spot that captures the desired tonal characteristics. Adjusting the distance and angle between the microphone and the vocalist can significantly impact the recorded sound.
- Preamp and converters: Use high-quality preamplifiers and analog-to-digital converters to ensure accurate and transparent signal capture. Clean and transparent recordings provide a solid foundation for EQing.
- Recording quality: Pay attention to technical aspects such as gain staging, signal-to-noise ratio, and avoiding clipping. Maintaining high recording quality minimizes the need for corrective EQing later on.
By taking the time to properly set up your recording environment, choosing the right microphone, and employing effective recording techniques, you can lay the groundwork for successful vocal recordings. These steps will help minimize the need for excessive EQing and allow you to focus on enhancing the vocals in the mixing phase.
Check out our Best Vocal Microphones Guide - Condenser vs. Dynamic
You can't make a vocal sound the way you want with EQ alone, but there are some EQ moves that you can do to make your vocal sound better.
How to EQ vocals - 5 Easy Steps to Professional Sounding Vocals
When you first listen to the recorded vocal in solo you may think that it doesn't really sound that bad. You know, it sounds like a decent recording and that's the way it should be. But when you play it in the mix you'll probably notice that it actually sounds a bit muffled, like it's not very clear in the mix.
You may have tried bringing up the volume but then it doesn't sound like it's sitting in the mix. Instead, it sounds like it's sort of sitting on top of it. It's not mixing together with all the other instruments and that's why we need to use EQ. To make it match the sound of the other instruments and make it sit in the mix a bit more.
Alright, so the first thing you’ll need to do is get your EQ. In this example, I will be showing screenshots of the Logic Pro X stock EQ, but you can use any parametric EQ you want. You can also get EQs that don't actually show the graph, but I think when you're just starting out it helps to be able to see what's going on.
I know a lot of guys say listen with your ears, not with your eyes and that's true. But when you're starting out it really helps to understand where these frequencies are in the spectrum. It's also good to get a visual idea of where the frequencies are and know that the low frequencies are on the left and the high frequencies are on the right.
1. High Pass Filter / Low Cut Filter
So step one is to use a high-pass filter. What a high pass/low cut filter does is only allow the high frequencies or the frequencies above a certain point to pass through and it rolls off the low frequencies. It’s also called a low-cut filter as it cuts out the low frequencies. You can call it whatever is simplest for you to remember. Put simply a high-pass/low-cut filter is cutting the low frequencies and without touching the high frequencies.
A high-pass/low-cut filter can help make the vocal tracks less muddy and generally cleaner sounding in a mix. It will also help to remove any low-end noise or rumble that may have been picked up during the recording process.
So why would we want to use a high-pass filter?
What a high pass filter does is it just cleans up your track and takes out all that low-end energy and sounds you don't need in a vocal. It might sound fine by itself when the vocals soloed, but when you put it in the track it's just going muddy up the mix.
What I like to do is play the vocal soloed and then move the high-pass filter up the low frequencies until I start to hear it rolling off the low-end frequencies of the vocal (around 110-180 Hz). I then just back it off a little bit so that you don't actually hear it. It's more just to make sure that it's in there and remove any really low frequencies.

At the end of the day, we don't really want to hear it taking off the low-end frequencies because we just wanted to roll off what we don't hear. The sound/frequencies that are going to muddy up the track and if we take them out it'll sound a lot cleaner in context with the mix.
2. Brighten the Vocals for Air & Sparkle
Now, this is really just a rule of thumb like I mentioned but on most vocal tracks it's nice to add a little bit of top-end. I like to use just a shelving filter and a shelving filter is one that kind of looks like a shelf because when you move it up it raises all the frequencies above that certain point.

The other kind of filter you get is the bell curve which is one that looks like this.

I find that the shelving filter just sounds more natural though because it boosts all the frequencies together.
So what I tend to do is playback the vocal again and I just raise that shelf until I start to hear a bit of a Sheen being added to the vocal. The frequency that you want to aim for is anywhere from 8 kHz to about 12 kHz or even 16 kHz if you want it to be really subtle.
There's really no rules with this it's just about hearing what sounds good, so you've just got to experiment with it a bit. Try playing the vocal with the rest of the mix and boosting the shelf from 1dB - 6dB. Also, try bypassing the EQ and check that it's sounding okay and hopefully it's sounding a bit clearer.
3. Mid-range Sweep
This is where you take out some of the mid-range frequencies. You're just looking for any bad-sounding frequencies and dropping those a bit. Let me show you what I mean, there's a little trick that you can do. If you boost a mid-range frequency you want to make it kind of a little bit thinner by adjusting the bandwidth or Q.

What you want to do is look for the most offending frequency, so the one that may be kind of hurting your ears a bit. When you listen to that boosted frequency it just doesn't sound very good. You may be able to hear a kind of nasal sound. As a rule of thumb, it's usually between 800 hertz and 1kHz and you can cut this a bit. It usually makes the vocal sound better. You don't want to cut it all the way out though.

Hopefully, you should hear that it makes the vocal sound a little bit cleaner and a bit more professional sounding. The differences may be subtle but they do make a big difference in the mix.
4. Reducing low-mid Frequencies
If you're still finding that your vocal is not sitting in the track and you find that it seems to be jumping out the mix a bit still. Then the usual offending frequency or range is this low mid-range.

So what you want to do is boost frequencies around 280 Hz and see if you hear any bad sounding frequencies around there. If you find any that are a problem then you can just cut them back a little bit. Be careful that you don't overdo this though as your vocals can start to sound a bit thin. In some cases, you may not need to do this at all.
5. Tackle Sibilance with a De-Esser
Excessive sibilance or sharp "S" sounds in vocals can be distracting and take away from the overall quality of the performance. To address this issue, you can use a de-esser, which is a specialized tool designed to target and reduce the intensity of high-frequency sibilant sounds. By applying a de-esser to your vocal tracks, you can achieve a smoother and more polished vocal sound.
What is a De-Esser?
A de-esser is a dynamic processor commonly used in vocal processing to control sibilance. It works by detecting and attenuating the frequencies associated with sibilant sounds, typically in the range of 4 kHz to 10 kHz. By specifically targeting these frequencies, a de-esser can effectively reduce the harshness and piercing quality of sibilant consonants, such as "s" and "sh" sounds.
Applying a De-Esser in Your Mixing Process
When using a de-esser, it's important to follow these steps to achieve optimal results:
- Identify the sibilant sections: Listen to your vocal tracks and identify the sections where sibilance is most prominent. Pay close attention to moments where "s" and "sh" sounds are pronounced.
- Insert the de-esser: In your digital audio workstation (DAW) software, insert a de-esser plugin on the vocal track you wish to process. Most modern DAWs have built-in de-esser plugins, or you can choose from various third-party plugins available.
- Adjust the threshold: The threshold setting determines the level at which the de-esser starts reducing the sibilant frequencies. Set the threshold so that it engages when the sibilance becomes noticeable but doesn't affect the rest of the vocal performance.
- Set the frequency range: Specify the frequency range that the de-esser should target. This range should encompass the prominent sibilant frequencies, typically around 4 kHz to 10 kHz. Adjust the frequency range until you achieve the desired reduction of sibilance.
- Control the amount of reduction: The de-esser typically provides controls to adjust the amount of reduction applied to the sibilant frequencies. Use this control to find the right balance between reducing sibilance and maintaining the natural timbre and clarity of the vocals.
- Fine-tune the de-esser: Listen to the vocal track in the context of the mix and make any necessary adjustments to the de-esser settings. It's crucial to find the sweet spot where the sibilance is tamed without compromising the overall vocal performance.
Remember that the goal of using a de-esser is to achieve a balanced and controlled vocal sound, so use your ears as your guide and make adjustments based on what sounds best in the context of the mix.
Advanced EQ Techniques for Vocals
In this section, we will delve into three powerful techniques that can take your vocal mixing skills to the next level.
Dynamic EQ for Vocal Control and Shaping
One of the most effective tools for vocal control and shaping is dynamic EQ. Unlike traditional static EQ, dynamic EQ allows you to dynamically process specific frequency bands based on the input signal's level. This means that you can selectively apply EQ adjustments only when certain frequencies exceed a certain threshold.
Dynamic EQ can be used to address specific issues in the vocal performance, such as taming harsh resonances or controlling sibilance. By setting up a dynamic EQ plugin, you can target problem areas and ensure that the vocal sits well in the mix without compromising its natural character.
Here are some of my favorite Dynamic EQ Plugins:

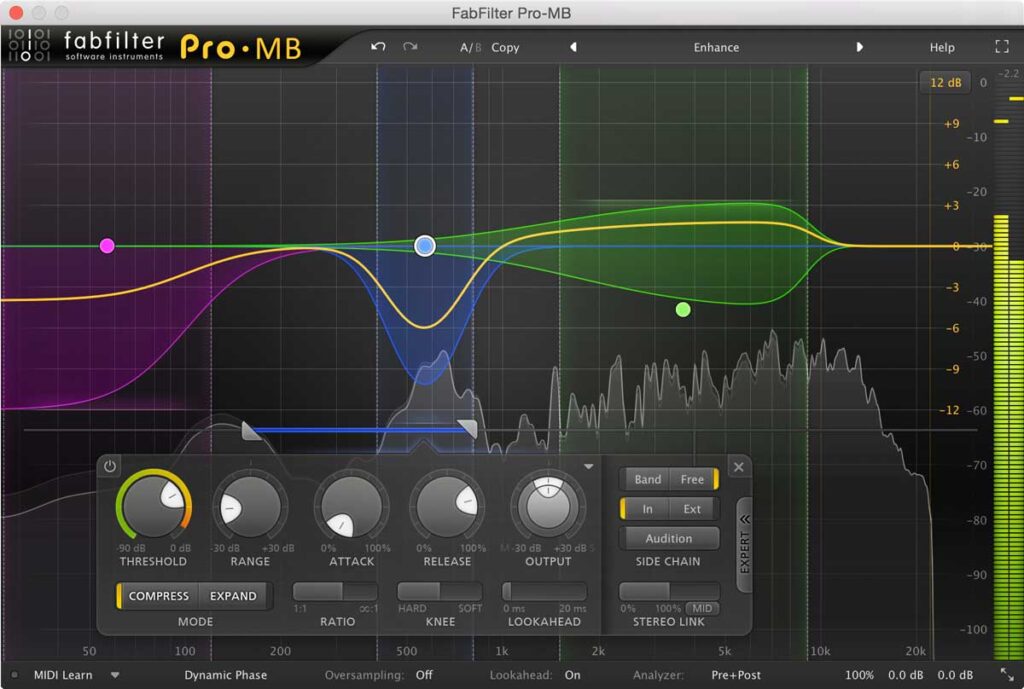
Multiband Compression in Conjunction with EQing
In addition to EQ, another technique that can greatly enhance vocal clarity and balance is multiband compression. By combining the precise frequency control of EQ with the dynamic range control of compression, you can achieve a more controlled and consistent vocal sound.
The key is to use multiband compression in conjunction with EQing to address different aspects of the vocal performance. For example, you can use EQ to shape the tonal balance and then apply multiband compression to smooth out any inconsistencies in the vocal's dynamics.
Remember to use a gentle touch with compression and ensure that it complements the EQ adjustments rather than overpowering them. The goal is to achieve a natural and transparent compression that enhances the vocal's expressiveness and intelligibility.
Here are some of my favorite Multiband Compressor plugins:
Using Automation for EQ Adjustments Throughout the Song
While static EQ adjustments are made during the mixing process, using automation for EQ can provide finer control and address specific changes within the song. Automation allows you to adjust EQ settings dynamically at different sections or moments in the song, ensuring that the vocals sit well in the mix and adapt to the overall musical context.
For example, you can automate EQ parameters to enhance certain phrases or emphasize the vocals during a chorus. By making subtle or pronounced EQ adjustments at specific points, you can create a more engaging and dynamic vocal performance.
To effectively use automation for EQ adjustments, it's essential to have a thorough understanding of the song's arrangement and structure. Listen closely to the vocal performance and identify sections where EQ tweaks can enhance the impact or emotion of the vocals.
Tips and Tricks for EQing Vocals
Here are a few more tips and tricks that can help you achieve a professional sound. Here are some techniques you can try:
Utilizing reference tracks for EQ guidance
One effective way to EQ vocals is by using reference tracks as a guide. Choose a well-mixed song in a similar genre and listen carefully to how the vocals sound in that track. Pay attention to the frequency balance and overall tonality. Use this reference track as a benchmark to guide your EQ adjustments.
Experimenting with different EQ settings for creative effects
While EQ is commonly used for corrective purposes, it can also be a powerful creative tool. Don't be afraid to experiment with different EQ settings to achieve unique and interesting vocal effects. For example, you can try boosting certain frequency bands to add warmth or presence to the vocals. Alternatively, you can use EQ to create a lo-fi or vintage sound by cutting specific frequencies. Let your creativity guide you in finding new and exciting ways to shape the vocal sound.
Using EQ in conjunction with other vocal processing techniques
EQ should not be used in isolation when processing vocals. It is often most effective when used in conjunction with other techniques. For example, you can use a de-esser to tame sibilance or harsh high-frequency sounds before applying EQ. Additionally, consider using compression or dynamic EQ to further control the dynamics of the vocals. By combining EQ with other vocal processing tools, you can achieve a more polished and professional sound.
Remember, EQing vocals is a subjective process, and there's no one-size-fits-all approach. Each vocal recording and mix will have its own unique characteristics that require individual attention. Trust your ears, experiment, and don't be afraid to make bold EQ choices to achieve the desired result.
Backing Vocal EQ Tips
The previous steps can also be used to EQ backing vocals. I would recommend not boosting too much top-end though. This will help your backing vocals to sit more in the background of the mix.
If you have a big mix with several backing vocals, it can help to apply quite a low-cut filter (around 150Hz - 250Hz) this will help the backing vocals sit in the mix and not distract from the lead vocals.
Common Mistakes to Avoid When EQing Vocals
There are some common mistakes that beginners often make. By being aware of these pitfalls, you can ensure that your vocal recordings and mixes sound professional and polished. Let's take a look at these mistakes and learn how to avoid them.
Over-EQing and Excessive Boosting/Cutting
One of the most prevalent mistakes in EQing vocals is overdoing it. It's easy to get carried away with boosting or cutting certain frequencies, thinking that it will instantly improve the sound. However, excessive EQ adjustments can result in an unnatural and unbalanced vocal sound.
To avoid over-EQing, it's essential to have a clear objective in mind and use EQ sparingly. Instead of making drastic changes, focus on subtle adjustments that enhance the vocal without altering its natural character. Remember, less is often more when it comes to EQ.
Neglecting the Context of the Mix and Overall Tonal Balance
Another mistake to avoid is neglecting the context of the mix and overall tonal balance. While it's crucial to EQ the vocals to sound great on their own, they also need to fit well within the entire mix. Neglecting the context can lead to vocals that sound out of place or clash with other elements.
To ensure a cohesive and balanced mix, listen to your vocals in the context of the entire arrangement. Pay attention to how they interact with other instruments and adjust the EQ accordingly. Make sure the vocals occupy the right frequency space without overpowering or being overshadowed by other elements.
Not Considering the Characteristics of the Vocalist
Every vocalist has a unique voice with its own tonal qualities and characteristics. Failing to consider these individual traits can result in EQ settings that don't flatter the vocalist's voice or highlight their strengths.
When EQing vocals, it's essential to take the characteristics of the vocalist into account. Consider factors such as the vocalist's range, timbre, and natural resonances. Adapt your EQ adjustments to enhance the best qualities of their voice while addressing any potential issues.
Final Thoughts
In this guide, we have explored various techniques and strategies for EQing vocals in a professional manner. By following the easy 6-step method and incorporating the tips provided by experts in the field, you can achieve a polished and balanced vocal sound in your recordings and mixes.
Recap of Key Points Covered in the Guide
- Step 1: High Pass Filter / Low Cut Filter: Start by applying a high-pass filter to remove unwanted low frequencies below 100 Hz. This helps to clean up the mix and make room for other instruments.
- Step 2: Brighten the Vocals for Air & Sparkle: Add brightness and presence to the vocals by boosting frequencies in the high-end range, around 5-10 kHz. This enhances the vocal's articulation and adds sparkle to the overall sound.
- Step 3: Mid-range Sweep: You're looking for any problem frequencies in the mid-range and dropping those a bit
- Step 4: Reduce Muddiness & Boominess: Address any muddiness or boominess in the vocals by using a parametric equalizer to cut frequencies in the low-mid range, typically between 250-500 Hz. This step improves clarity and definition in the vocal sound.
- Step 5: Tackle Sibilance with a De-Esser: Use a de-esser to address any excessive sibilance or sharp "S" sounds in the vocals. This tool specifically targets and reduces the intensity of high-frequency sibilant sounds, resulting in a smoother vocal performance.
Remember that EQing vocals is an art, and there's no one-size-fits-all approach. As you gain experience and confidence in your EQing skills, don't hesitate to experiment with different techniques and develop your own signature sound. Every vocalist and recording is unique, and finding the right EQ settings may require some trial and error.
Importance of Critical Listening and Regular Practice in Honing EQ Skills
Developing a keen sense of critical listening is crucial for effective EQing. Train your ears to identify specific frequency bands and nuances in the vocal sound. Regular practice and experimentation with EQ settings will help you become more proficient in achieving the desired results.
By applying these principles and techniques, you can elevate the quality of your vocal recordings and mixes. Remember that EQing is just one piece of the puzzle, and factors like recording quality, microphone choice, preamplifier, converters, and room acoustics also play significant roles in achieving professional-sounding vocals.
So, dive in, embrace the process, and enjoy the journey of crafting exceptional vocal sounds through EQing. With the right tools, knowledge, and dedication, you'll be able to shape your vocals into captivating performances that stand out in any mix.
One mixing technique that I haven't covered in this post, that you should also consider, to help the vocal sit in the mix is compression. Check out our Guide to Compression for more information.
We've also got another guide on How to get vocals to sit in the mix, this article has some more techniques that you may find helpful.


