Getting a huge, professional-sounding electric guitar tone inside a spare bedroom, closet, or apartment corner feels impossible when you can't crank a tube amp without your neighbors banging on the wall. The truth is, professional studios no longer have a monopoly on great guitar tone. Learning how to record electric guitar at home really comes down to picking the right capture method for your room, gear, and genre — then nailing a handful of technical details that most beginners skip entirely.
There are three proven ways to record electric guitar at home: Direct Input (DI) recording through amp-simulator plugins, microphone capture of a real amplifier, and a hybrid approach using a reactive load box with impulse responses (IRs). DI is the cheapest and quietest option, miking a real amp delivers the most authentic tone, and load boxes let you record a cranked tube amp completely silently.
Table of Contents
- Choosing Your Path: The 3 Recording Methods Compared
- Method 1: The Modern Way (DI Recording & Amp Simulators)
- Method 2: The Traditional Way (Miking a Real Amplifier)
- Method 3: The Hybrid Way (Load Boxes & Silent Recording)
- Solving the 3 Most Common Home Recording Problems
- Pro Production Techniques for a Massive Sound
- Frequently Asked Questions
Choosing Your Path: The 3 Recording Methods Compared
Before buying anything, decide which recording path actually fits your room, your neighbors, and your genre. The table below breaks down the three main approaches to recording electric guitar at home.
| Method | Best For | Gear Required | Noise Level | Ideal Genres |
|---|---|---|---|---|
| Direct Input (DI) + Amp Sims | Beginners, apartment players, budget setups | Audio Interface + Plugin | Zero (headphones) | Modern Metal, Pop, Indie |
| Microphone + Real Amp | Purists, rock/blues players, treated rooms | Tube Amp + Dynamic/Ribbon Mic | Very Loud | Classic Rock, Blues, Jazz |
| Load Box / IR Hybrid | Players who love their real amp but can't crank it | Tube Amp + Reactive Load Box + IRs | Zero to Low | Anyone wanting real tube tone silently |
For a deeper breakdown of the hardware behind Method 1, see our Best Audio Interfaces for Home Recording guide.
🎸 Quick Quiz: Which Recording Method Fits You?
Click the option that matches your situation and we'll jump you straight to the right section.
Method 1: The Modern Way (DI Recording & Amp Simulators)
Direct Input recording is the fastest, quietest, and cheapest way to record electric guitar at home. You plug straight into your audio interface and shape the tone entirely inside the computer using amp-simulator software — no amp, no mic, no noise complaints.
Setting Up Your Audio Interface
Your guitar's pickups produce a high-impedance signal, so plugging it into a standard low-impedance line or mic input will result in a thin, weak, muffled tone. Always use the dedicated Hi-Z (Instrument) input on your interface — usually labeled with a small guitar icon next to the combo jack. This matches the guitar's impedance properly and preserves the natural high-end detail of your pickups.

Focusrite Scarlett Solo (3rd Gen)
A rock-solid entry-level interface with a dedicated Hi-Z instrument input, low-latency drivers, and a clean preamp — everything you need to start recording electric guitar at home tonight.
Need help choosing between models? Check our full Audio Interface Buying Guide.
Top Amp Plugins
Amp-simulator plugins have gotten so good that many professionally released records use them exclusively. Here's how the leading options break down by genre:
- Neural DSP (Archetype series) — best for metal, prog, and high-gain djent tones with studio-grade IRs baked in.
- Line 6 Helix Native — the most versatile option, covering everything from clean jazz to full metal, plus effects and modulation.
- IK Multimedia AmpliTube — huge library of vintage and boutique amp models, great for classic rock and blues tones.
The Secret Sauce: Impulse Responses (IRs)
An Impulse Response (IR) is a digital audio "snapshot" that captures the exact sonic fingerprint of a real speaker cabinet, microphone, and room combination — allowing you to load that captured cabinet tone onto any amp sim. Roughly 80% of what your ears perceive as "digital tone" actually comes from the virtual speaker cabinet (the IR), not the amp head model. Swapping IRs is one of the fastest ways to instantly transform a flat, harsh digital guitar tone into something that sounds like it was miked in a real studio.
Method 2: The Traditional Way (Miking a Real Amplifier)
If you have a room that can handle some volume — or at least a few hours where nobody minds the noise — miking a real amp is still the gold standard for authentic rock, blues, and jazz tones. If your room isn't treated yet, start with our Home Studio Acoustic Treatment Guide before you commit to this method.
Selecting the Right Microphone
- Dynamic mics (Shure SM57, Sennheiser e906) — built to handle the extremely high Sound Pressure Level (SPL) coming off a guitar speaker without distorting.
- Ribbon mics (Royer R-121) — naturally smooth out harsh high-end frequencies, giving a warmer, more vintage character.


Not sure which mic to pair with vocals too? Compare options in our Best Microphones for Home Recording guide.
Microphone Placement Strategy
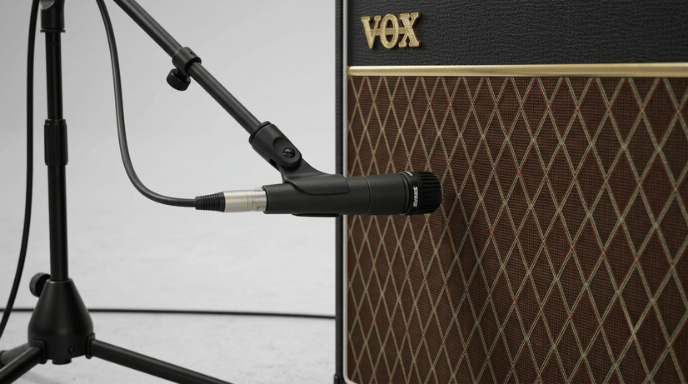
On-Axis vs. Off-Axis: Pointing the mic directly at the center of the speaker cone (on-axis) produces a bright, aggressive, cutting tone. Moving the mic toward the outer edge of the cone (off-axis) rolls off high frequencies for a darker, warmer sound.
The "Cap-Edge" Sweet Spot: Most engineers aim the mic directly at the boundary where the center dust cap meets the speaker paper — the cone boundary. This position blends the brightness of the cap with the warmth of the cone paper, producing a balanced tone that sits well in a mix without extra EQ.
Method 3: The Hybrid Way (Load Boxes & Silent Recording)
What if you love the feel of a real tube amp cranked into power-tube saturation, but can't legally make that much noise at 11pm? A reactive load box solves this problem entirely.
What is a Reactive Load Box?
A reactive load box is a hardware device that connects between your amp's speaker output and a real (or virtual) speaker cabinet, safely absorbing the power section's output so the amp can be driven hard without ever reaching an actual speaker or damaging the output transformer. The load box converts that absorbed signal into a clean, low-level line output that you can run through IRs and record silently through headphones.

Universal Audio OX Amp Top Box
A reactive load box and IR loader in one unit, letting you crank a real tube amp into full power-section saturation while recording completely silently.
Why This Beats Simple Direct Outs
Cheap "direct out" jacks on some amps simply tap the signal before the speaker with no load at all, which can sound thin and unnatural — or in some designs even damage the amp. Reactive load boxes are specifically engineered to mimic the impedance curve of a real speaker cabinet across the frequency spectrum, so the power tubes react and compress exactly like they would if they were pushing an actual 4x12 cab. That's the difference between a fake DI tone and a genuinely miked-sounding recording.
Solving the 3 Most Common Home Recording Problems
Problem 1: Ground Loops and Electric Buzz
Solution: Route your guitar through a DI box with a ground-lift switch, keep guitar cables away from computer monitors and power supplies, and avoid daisy-chaining power strips between your amp and interface. A dedicated DI box also cleans up signal clarity on budget interfaces.

Radial ProDI Passive Direct Box
An industry-standard passive DI box with a ground-lift switch, ideal for eliminating hum and buzz in home recording setups.
Problem 2: Latency (Audio Delay)
Solution: If you hear a delay between playing a note and hearing it back through your amp sim, lower your DAW's buffer size to 64 or 128 samples in your audio settings. This reduces the round-trip time between your interface and computer at the cost of slightly higher CPU load — a worthwhile trade-off while tracking.
Problem 3: Thin, Weak Tones
Solution: Check your gain staging. Your input level should peak around -12dB to -6dB in your DAW — loud enough to avoid noise floor issues, but never clipping into the red. A signal that's too hot distorts digitally; a signal that's too quiet sounds thin and lifeless once you add gain later.
Pro Production Techniques for a Massive Sound
The Power of Double-Tracking
To get that huge, wide rhythm guitar wall you hear on professional records, record the same part twice as two completely separate takes — not one track duplicated and copy-pasted. Pan one take 100% left and the other 100% right. The tiny natural timing and pitch differences between the two human performances create genuine stereo width that a duplicated track can never replicate, since a copy-pasted track is phase-identical and just sounds louder, not wider.
Basic EQ for Guitars
- Apply a high-pass filter around 80Hz to remove low-end rumble and clear space for the bass guitar and kick drum.
- Cut a narrow notch around 4kHz where harsh, fatiguing frequencies tend to build up, especially on high-gain tones.
For a full mixing walkthrough once your guitars are tracked, see our Home Studio Setup Guide and How to Record Vocals at Home for pairing techniques.
Frequently Asked Questions
Can I record electric guitar without an audio interface?
No. You need some way to convert your guitar's analog signal into digital audio your computer can process — either a standard audio interface with a Hi-Z input, or a USB-enabled modeling amp or multi-effects pedal that can connect directly to your computer.
Is an SM57 good for recording guitar at home?
Yes. The Shure SM57 is the industry-standard guitar cab microphone thanks to its mid-range focus, high SPL handling, and durability. It's found on more classic rock and metal records than almost any other single microphone.
Do I need a DI box if my interface has an instrument input?
Usually not — a built-in Hi-Z instrument input handles impedance matching just fine for most home setups. However, a dedicated active DI box can improve signal clarity and reduce noise on cheaper or older interfaces.
Whichever path you choose, learning how to record electric guitar at home is really a matter of matching the method to your room and gear, then paying attention to the small technical details — impedance, mic placement, gain staging, and double-tracking — that separate a demo from a record. Start with DI and amp sims if you're just getting going, and expand into miking or a reactive load box once you're ready to chase a more authentic, room-captured tone.
Last update on 2026-08-20 / Affiliate links / Images from Amazon Product Advertising API