

GarageBand is Apple's free digital audio workstation (DAW) included with every Mac, and it's the best starting point for beginners who want to record music, podcasts, or voiceovers. To use GarageBand on Mac: open the app, create an Empty Project, connect a microphone or instrument, hit R to record, then export your song via Share > Export Song to Disk. Keep reading for the complete step-by-step walkthrough.
Whether you're a complete beginner or an aspiring home studio producer, GarageBand on Mac is your most powerful free tool for making professional-sounding music. In this guide, I'll walk you through everything — from first launch to final export — using a proven workflow that works on all current Macs, including M-series Apple Silicon machines.
[toc]
1. What Equipment Do You Need to Use GarageBand on Mac?
Before we dive in, let's cover the gear. GarageBand is free on macOS, but the audio quality of your recordings depends almost entirely on what you plug in. Here are the three main setups, from basic to best:
Option 1: USB Microphone (No Interface Needed)
A USB microphone connects directly to your Mac — no audio interface required. It's the simplest way to get started, especially for podcasting or voiceovers. The downside is you're limited to one microphone at a time.
Option 2: XLR Microphone + Audio Interface (Recommended)
For the best quality and flexibility, pair a professional XLR condenser or dynamic microphone with an audio interface. The interface converts the analog signal from your mic into a digital signal your Mac can work with, while providing clean preamps, phantom power for condenser mics, and low-latency monitoring. For a full breakdown, see our Audio Interface Buying Guide.
Our top beginner recommendation: The Focusrite Scarlett Solo 4th Gen is our go-to starter interface. It delivers 24-bit/192kHz studio-quality preamps, an improved Air mode for adding presence to vocals and guitars, and ships with Ableton Live Lite and Pro Tools Intro. It's the most popular beginner interface in the world for good reason.

Focusrite Scarlett Solo 4th Gen
Best starter audio interface. 1 mic + 1 instrument input, Air mode, 3-year warranty.

RØDE NT1-A Condenser Microphone
One of the world's quietest studio mics. Includes shock mount & pop filter.
If you'd prefer a dynamic microphone that doesn't require phantom power, the is the industry gold standard for broadcast vocals, while the Shure SM58 is a rugged, affordable live-performance mic that also records very well at home. For a full comparison, check out our guide to the 8 Best Vocal Microphones for Home Studio Recording.
💡 Pro Tip: If you're using a condenser microphone like the RØDE NT1-A, you MUST enable the 48V phantom power button on your audio interface before recording. Dynamic mics like the SM7B and SM58 do not need phantom power.
For a complete list of everything you need, visit our Home Recording Studio Equipment List for Beginners. Or if you want everything in one box, check out our guide to the best Home Recording Studio Bundles & Packages.
2. Getting Started: Installation & Project Setup
System Requirements
GarageBand is free from the Mac App Store and works on macOS Ventura, Sonoma, and Sequoia. You'll need at least 4GB of RAM and around 6GB of free storage for the base install (additional Sound Library downloads can reach 75GB+). It runs on all Mac models from 2017 onwards.
Creating Your First Project
When you first launch GarageBand, a project chooser window appears offering several preset templates (Keyboard Collection, Amp Collection, Voice, Hip Hop). While these can be useful later, I recommend beginners always select Empty Project — this forces you to learn the interface from scratch rather than relying on pre-loaded settings.
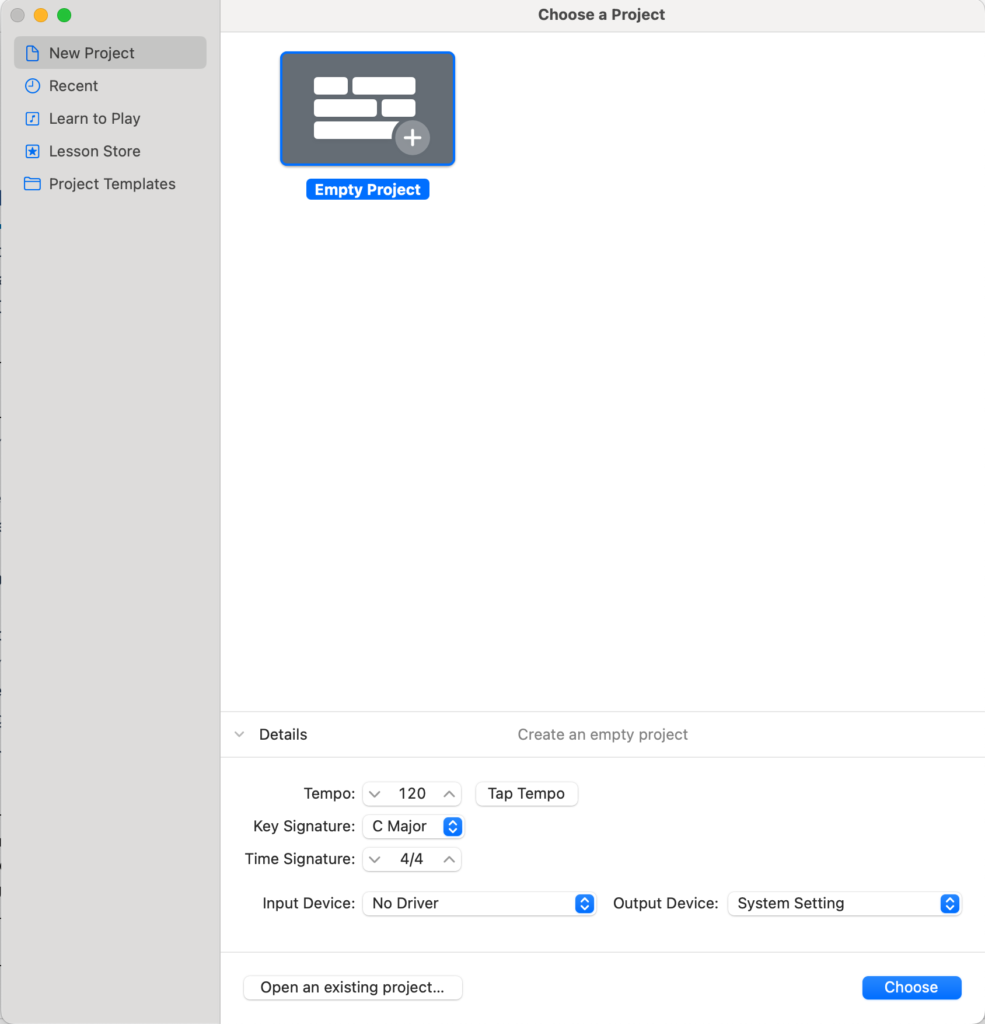
Before hitting Create, click the Details dropdown to set:
- Tempo (BPM): The speed of your song. Pop/rock is typically 120 BPM, hip-hop 80–100 BPM, EDM 128+ BPM. Tap the tempo using your mouse if you have a feel for it.
- Key Signature: Choose the musical key of your song (e.g., C Major, A Minor).
- Time Signature: Most songs use 4/4. Waltz is 3/4. Leave this at 4/4 unless you know otherwise.
- Input/Output Device: If you have an audio interface connected, select it here for both input AND output. This routes your recording signal correctly from the start.
💡 Pro Tip: Don't stress about tempo and key before recording. You can change both settings at any time via the LCD display at the top of GarageBand's main window without affecting your existing recordings.
GarageBand's interface is built around five core areas. Learn these and you'll never feel lost.
| Area | Keyboard Shortcut | What It Does |
|---|---|---|
| Library | Y | Browse and apply instrument patches, amp presets, and vocal effects to the selected track |
| Smart Controls | B | Quick-access panel for adjusting EQ, reverb, compression, and other effects on the current track |
| Toolbar & LCD Display | — | Transport controls (play, stop, record), tempo/key display, and project settings |
| Tracks Area | — | The main timeline where all your audio, MIDI, and loop regions are arranged |
| Editors | E | Toggle between the Piano Roll (MIDI editing) and the Audio Editor (waveform editing) |
The Loop Browser (O) is also essential — it's where you'll find thousands of royalty-free Apple Loops sorted by genre, mood, and instrument.
4. How to Record Audio: Vocals, Guitar & Live Instruments
Step 1: Create a New Audio Track
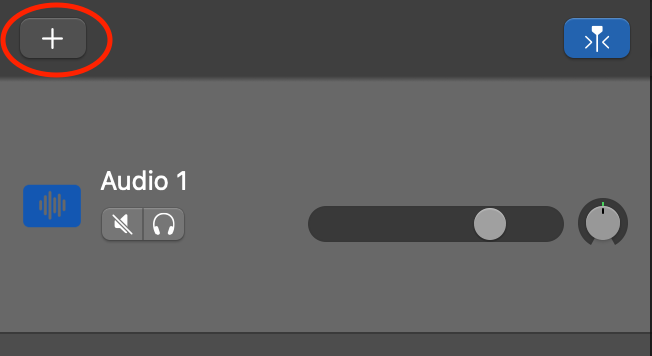
Click the + button in the top-left of the Tracks area (or go to Track > New Track). In the pop-up, select the microphone icon — "Record using a microphone or line input." Then choose which input on your audio interface the mic is plugged into (Input 1 for channel 1, Input 2 for channel 2). Hit Create.
Step 2: Set Your Input Level
Turn down your studio monitors (or speaker output) to prevent feedback. Click the orange Input Monitoring button on the new track to hear yourself through headphones. Now turn the Gain knob on your audio interface while speaking or singing — you want the track's level meter to peak in the green/orange zone. If it turns red, you're clipping, which permanently distorts the recording.
💡 Pro Tip: Always record vocals in Mono (single input), not stereo. A mono vocal sits better in the centre of a mix and gives you more control when adding effects like reverb and delay later.
Step 3: Use the Tuner
Before recording guitar or bass, click the Tuner icon in the toolbar (or press Cmd + T with a track selected). This ensures you're in tune before a single note is captured.
Step 4: Record
Press R or click the red Record button in the transport. GarageBand will count in for one bar (four beats) before recording begins. When you're done, press Spacebar to stop. Hit Spacebar again to play back what you just recorded.
If you want to redo a take, press Cmd + Z to undo, then record again. To change the length of a recorded region, drag its bottom-right corner to trim it, or drag from the top-right corner to loop it.
Track Controls Explained
- Solo (Headphone icon): Turns yellow when active. Mutes all other tracks so you can focus on one at a time.
- Mute (Speaker icon): Turns grey when muted. Silences that track without deleting it.
- Volume Fader: Controls the playback level of that track in the mix.
- Pan Knob: Rotates left or right to position the track in the stereo field. Centre is the default for vocals; panning guitars slightly left/right creates a wider sound.
5. How to Use Software Instruments & MIDI in GarageBand
Creating a Software Instrument Track
Click the + button again, but this time select Software Instrument. GarageBand will load a default piano patch. From the Library (Y), explore hundreds of sounds: bass, drums, strings, synths, guitars, mallets, and orchestral instruments.
Using Musical Typing (No MIDI Keyboard Required)
Press Cmd + K to open the Musical Typing keyboard. Your Mac's QWERTY keyboard becomes a virtual piano. Key mappings include:
- A = D note (home row)
- Z = shift down an octave / X = shift up an octave
- C / V = decrease / increase note velocity (how hard the note is "hit")
- Tab = Sustain (hold notes like a piano pedal)
- 1 / 2 = Pitch bend down / up
- 3–8 = Modulation wheel (tremolo effect)
For more expressive playing, a dedicated MIDI keyboard is well worth the investment. Most connect via USB and are recognised by GarageBand automatically — no drivers needed. See our guide to the home studio equipment essentials for recommendations.
The Drummer Track: AI-Powered Human-Sounding Beats
GarageBand's Drummer track is one of its most impressive features. Create a new track, select Drummer, and choose from a range of virtual session drummers (rock, hip-hop, electronic, Latin styles). Each drummer has its own personality and kit. Use the X/Y pad in the Smart Controls to adjust complexity (left/right) and loudness (up/down). Enable the Follow option to lock the Drummer to your bass guitar track's groove.
💡 Pro Tip: The Drummer track automatically varies fills and patterns in different sections of your song. To control this, break your Drummer region into smaller pieces (Cmd + T at the playhead) and edit each section's style independently.
6. Using Apple Loops & Sound Packs
Press O to open the Loop Browser. You can search by instrument, genre, mood, or tempo. All Apple Loops are royalty-free — you can use them in commercial releases without additional licensing. Just drag a loop from the browser directly onto your Tracks Area to use it.
Producer Packs (Free Downloads)
GarageBand has expanded its free sound library significantly with curated Producer Packs from award-winning artists and producers. To download them, go to GarageBand > Sound Library > Download All Available Sounds. These packs offer loops and samples used by top industry producers, giving bedroom producers access to the same sonic palette as major-label records.
7. Editing & Arrangement: Cleaning Up Your Recording
Basic Region Tools
- Split a region at the playhead: Cmd + T — essential for cutting out unwanted noise between phrases.
- Join/merge regions: Select multiple regions, then Cmd + J.
- Loop a region: Hover over the top-right corner of a region until the cursor becomes a loop arrow, then drag right.
- Delete a region: Select it and press Backspace.
MIDI Editing in the Piano Roll
Double-click any MIDI region to open the Piano Roll Editor at the bottom of the screen. You'll see your notes displayed on a grid — the horizontal axis is time, the vertical axis is pitch. You can:
- Move a note: Click and drag left/right (time) or up/down (pitch).
- Stretch a note: Drag the right edge to change its duration.
- Delete a note: Select it and press Backspace.
- Add a note: Hold Cmd and click on the grid.
Quantization: Fixing Timing with One Click
In the Piano Roll, use the Time Quantize dropdown at the top-left to snap all notes to a musical grid. Set it to 1/8 Note for a tight, mechanical feel, or use the Q-Strength slider to apply partial quantization for a more human groove.
Flex Time: Fixing Timing in Audio Recordings
For audio tracks (vocals, guitar), double-click the region to open the Audio File Editor. Click the Flex button (the clock icon) to enable Flex Time. GarageBand will automatically detect the transients (attack points) in your recording. You can then drag individual transient markers to nudge notes or beats into time without affecting the surrounding audio.
8. Mixing and Mastering Like a Pro
The Mixing Workspace
A great mix starts with balance. Before adding any effects, set the volume of each track so no single instrument is drowning out the others. As a starting point: kick drum and bass guitar should be the loudest elements in a typical mix; vocals sit just above; guitars and keyboards fill the middle; hi-hats and percussion sit back.
Use the Pan knob to create width: try panning rhythm guitars to ±30–40, supporting keyboards to ±20, and keeping bass, kick drum, snare, and lead vocal dead centre.
Essential Effects: EQ, Compression & Reverb
Press B to open Smart Controls for the selected track. Here you'll find shortcuts to GarageBand's built-in effects. The three most important are:
- Visual EQ (Equalizer): Cuts or boosts specific frequency ranges. For vocals, try cutting around 200–300 Hz to reduce muddiness, and boosting around 3–5 kHz to add presence and clarity.
- Compressor: Controls dynamic range — makes loud parts quieter and quiet parts louder. A ratio of 3:1 to 4:1 with a medium attack and release works well on most vocals.
- Reverb/Space Designer: Adds a sense of physical space to dry recordings. Use sparingly — too much reverb makes a mix sound washed out.
Automation: The "Secret Sauce"
Press A to toggle Automation mode. Each track will display an automation lane where you can draw in volume or effect changes over time. Click the automation parameter dropdown to choose what to automate — Volume, Pan, Reverb Send, EQ settings, and more. Common uses include:
- Drawing in a gradual volume fade at the end of a song
- Automating a reverb send to increase on the last word of a vocal phrase
- Riding the volume of a guitar solo up during its section
The Master Track: Basic Mastering
Go to Track > Show Master Track to reveal the master output track. This is where you apply final polish to the entire mix. Add the Multipressor (a multiband compressor) and the Adaptive Limiter plug-in to the master track for a louder, more professional sound. The Adaptive Limiter prevents the mix from clipping (going above 0 dBFS) during export.
9. How to Export a Song from GarageBand
Which File Format Should You Choose?
| Format | Best For | File Size | Quality |
|---|---|---|---|
| MP3 | Sharing on social media, streaming, email | Small (~4–8 MB per minute) | Good (compressed) |
| AAC (M4A) | Apple ecosystem, iTunes/Apple Music | Small | Good (compressed) |
| AIFF | Archiving, sending to mastering engineers | Large (~10 MB per minute) | Lossless |
| WAV | Universal lossless standard for studios | Large (~10 MB per minute) | Lossless |
To export, go to Share > Export Song to Disk. Choose your format, quality setting, and destination folder. For sharing to SoundCloud directly, use Share > Song to SoundCloud.
💡 Pro Tip: Always keep a saved GarageBand project file (.band) as your master. Export a WAV or AIFF at 24-bit/44.1kHz for archiving, then create a separate MP3 at 320kbps for distribution. Never work from a compressed MP3 file.
10. Troubleshooting Common GarageBand Errors
| Error Message | Cause | Quick Fix |
|---|---|---|
| "Disk is too slow" | Slow HDD or USB drive can't keep up with recording | Record to your Mac's internal SSD. Go to Preferences > Audio/MIDI and increase the I/O Buffer Size to 256 or 512. |
| No sound / can't hear input | Wrong audio device selected or input monitoring is off | Go to GarageBand > Preferences > Audio/MIDI and set Input/Output to your interface. Enable the orange Input Monitoring button on your track. |
| "System Overload" | Too many tracks and plug-ins taxing the CPU | Select resource-heavy tracks and choose Track > Freeze Track. This renders the track to audio temporarily, freeing up CPU power. |
| GarageBand won't open | Corrupted preferences file | Hold Option + Cmd while launching GarageBand to reset preferences, or delete ~/Library/Preferences/com.apple.garageband10.plist |
| Audio interface not recognised | Interface not set as system audio device | Connect the interface before launching GarageBand. Go to Preferences > Audio/MIDI and select the correct device. |
11. GarageBand vs. Logic Pro: When Should You Upgrade?
GarageBand and Logic Pro share the same core recording engine, and many producers have made commercially released albums entirely in GarageBand. However, there comes a point where its limitations become frustrating. Here's an honest comparison:
| Feature | GarageBand | Logic Pro |
|---|---|---|
| Price | Free | $199.99 (one-time) or $4.99/mo |
| Track limit | 255 tracks | 1,000+ tracks |
| MIDI editing | Basic Piano Roll | Advanced: Step Sequencer, Score Editor, Drummer Editor |
| Pitch correction | Basic pitch correction | Flex Pitch — note-level pitch editing like Melodyne |
| Mixer | Simple track view | Full professional mixing console |
| Synthesizers | Good built-in instruments | Alchemy (world-class synth), Retro Synth, ES2 |
| Plug-in support | Audio Units (AU) only | AU + many 3rd-party options |
| Surround sound | No | Yes (Dolby Atmos support) |
| Project migration | One click | Open GarageBand project directly in Logic |
When to upgrade: If you're hitting GarageBand's limits — you need advanced pitch editing, a professional mixer, Logic's Alchemy synth, or more than 255 tracks — Logic Pro is the natural next step. The good news is that every GarageBand project opens directly in Logic Pro with no conversion needed.
If you're exploring other free DAW options in the meantime, check out our guide to the 10 Best Free Music Recording Software DAWs, or if you're on Windows, our list of Free GarageBand Alternatives for Windows.
12. GarageBand Keyboard Shortcuts Cheat Sheet
Memorising these shortcuts will dramatically speed up your workflow:
🎹 Interactive Keyboard Shortcuts Quiz
Click each shortcut to reveal what it does — then test yourself!
13. GarageBand Glossary: Key Terms for Beginners
New to music production? Here's a quick reference to the terminology used throughout this guide:
- DAW (Digital Audio Workstation): Software used to record, edit, mix, and produce music on a computer. GarageBand is a DAW.
- MIDI (Musical Instrument Digital Interface): A communication protocol that transmits musical performance data (note pitch, velocity, duration) rather than actual audio. MIDI data is infinitely editable.
- BPM (Beats Per Minute): The tempo or speed of a song. 120 BPM = 2 beats per second.
- Latency: The delay between playing a note and hearing it through your monitors. High latency makes playing in time feel impossible. A good audio interface minimises latency to below 10ms.
- Phantom Power (48V): A DC voltage supplied by an audio interface to power condenser microphones over an XLR cable. Not required by dynamic microphones.
- DAW Region: A block of audio or MIDI data on the timeline — the visual building blocks of your song arrangement.
- Quantize: The process of snapping recorded MIDI notes to the nearest rhythmic grid position to correct timing imperfections.
- Clipping: Distortion that occurs when a signal exceeds the maximum level (0 dBFS on a digital meter). Always avoid red on your level meters.
- Dry signal: The original recorded sound with no effects applied.
- Stem: An individual exported audio file for one instrument or group of instruments from a mix (e.g., "drums stem," "vocals stem").
14. Video Tutorial: GarageBand for Mac Beginners
If you prefer a visual walkthrough alongside this written guide, the video below provides a fast-paced overview of the GarageBand interface and basic recording steps — ideal for visual learners who find a written guide overwhelming on its own.
Frequently Asked Questions
Is GarageBand free on Mac?
Yes. GarageBand is completely free for all Mac users and can be downloaded from the Mac App Store. It includes a comprehensive built-in sound library, and additional Producer Packs can be downloaded for free within the app.
Can I use GarageBand without an audio interface?
Yes, but with limitations. You can record using your Mac's built-in microphone or a USB microphone without an interface. However, for professional-quality results with XLR microphones or instruments, an audio interface is essential. We recommend the best audio interfaces for home recording if you're unsure where to start.
How do I fix audio latency in GarageBand?
Go to GarageBand > Preferences > Audio/MIDI and reduce the I/O Buffer Size to 64 or 128 samples. A lower buffer size reduces latency but increases CPU load. Most modern Macs handle 128 samples easily during recording.
Can I use third-party plug-ins in GarageBand?
Yes. GarageBand supports Audio Units (AU) plug-ins, which are the standard plug-in format on macOS. Any AU-compatible compressor, EQ, synthesizer, or effect will appear in GarageBand's plug-in browser.
How do I transfer a GarageBand project to Logic Pro?
Simply open Logic Pro and use File > Open to locate your .band GarageBand project file. Logic will import it automatically, converting all tracks, regions, and settings with full fidelity. No manual export or conversion is required.
What microphone should I buy for GarageBand?
For vocals and acoustic recording, the Value "text" is not supported. condenser microphone is our top beginner recommendation — it's one of the world's quietest studio mics and ships with everything you need (shock mount, pop filter, dust cover). Pair it with the Value "text" is not supported. for an unbeatable beginner setup. For a full guide, see our best vocal microphones for home studio recording.
Conclusion
GarageBand is one of the most powerful free applications ever made — a fully featured DAW that can take you from recording your first guitar riff all the way to a polished, release-ready track. The learning curve is gentle, the tools are professional, and the upgrade path to Logic Pro is seamless when you're ready.
Start with an Empty Project, record a simple idea, and spend time exploring the Library, Smart Controls, and Drummer track. The more you experiment, the faster you'll develop your ear and your workflow. For more help building your home studio, explore our full Home Recording Studio Equipment List or our guide to the Best Audio Interfaces.
Last update on 2026-11-13 / Affiliate links / Images from Amazon Product Advertising API


