Quick Answer: First reflection points are the spots on your walls, ceiling, and floor where sound from your studio monitors bounces directly to your ears before the rest of the room's reverb arrives. Treating these points with absorption panels is the single highest-impact acoustic upgrade you can make in a home studio. The mirror trick lets you find every first reflection point in under five minutes — no apps, no meters, no guesswork.
Contents show
Key Takeaways
- First reflection points are where early sound bounces off surfaces and reaches your ears within roughly 5–15 ms of the direct signal [1]
- The mirror trick (also called the mirror test) is the fastest, most reliable DIY method for locating these points
- Side walls are the top priority — treat them before the ceiling, floor, or rear wall
- Each side wall has two distinct reflection points: one from the nearest speaker and one from the far speaker [3]
- Treatment panels need to cover a zone, not just the single spot the mirror identifies [1]
- Diffusion is the wrong tool for sidewall first reflections — absorption works better [3]
- Untreated first reflections color your mix and make your monitors sound inaccurate, no matter how good the speakers are
Why First Reflection Points Acoustic Treatment Actually Matters
Bad acoustics beat bad gear every time. You could have a pair of world-class studio monitors and still make terrible mixing decisions if your room is bouncing early reflections straight into your ears.
Here's what's happening: your monitors fire sound directly at you (the direct signal), but they also fire sound at your walls, ceiling, and floor. Those surfaces reflect the sound back toward the listening position milliseconds later. When a reflection arrives within roughly 10–20 ms of the direct signal and carries similar frequency content, your brain can't separate the two — it hears them as one blurred, colored sound [2].
That's why your low-mids sound muddy, your stereo image feels vague, and your mixes never translate to other speakers. It's not your monitors. It's your room.
First reflection points acoustic treatment fixes this by placing absorptive panels exactly where those early reflections originate. The result is a cleaner, more accurate signal reaching your ears — which means better mixing decisions every session.
What Exactly Is a First Reflection Point?
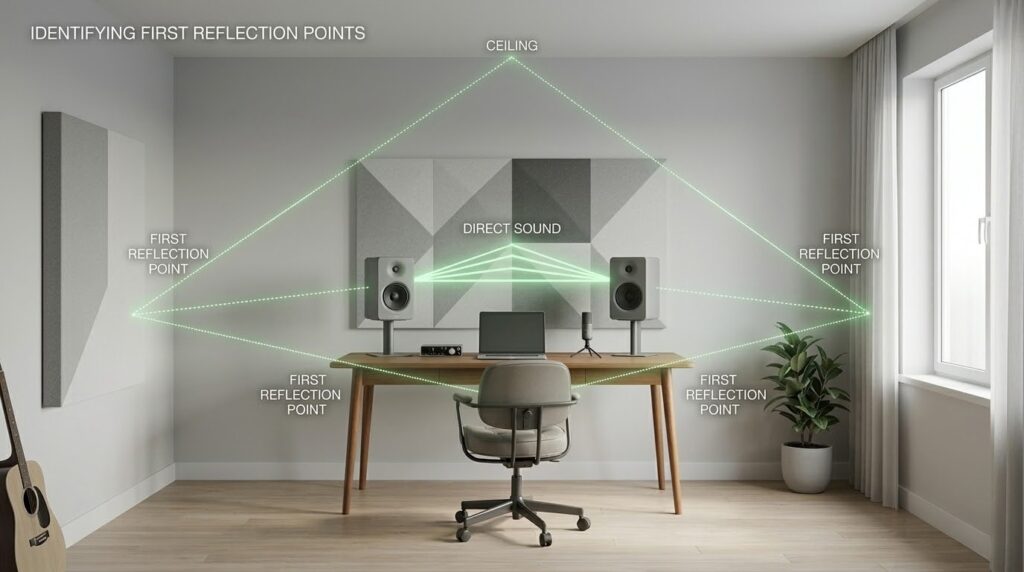
A first reflection point is the specific location on a surface where sound from a speaker takes the shortest possible bounce path to your ears.
Think of it like a pool table. If you're the cue ball and the speaker is the pocket, the first reflection point is where the ball hits the cushion on its way to you. It's geometry — the angle of incidence equals the angle of reflection. That's exactly why the mirror trick works so well.
These early reflections are perceptually significant because of their timing and spectral content [2]. A reflection arriving more than about 20 ms after the direct sound, or with significantly different frequency content, is far less likely to mess with your tonal perception. But in a typical bedroom studio — where walls are close and parallel — those reflections arrive fast and strong [1].
The surfaces to check, in priority order:
| Surface | Priority | Why It Matters |
|---|---|---|
| Left side wall | 🔴 High | Shortest path, arrives first |
| Right side wall | 🔴 High | Same as left — treat both together |
| Ceiling | 🟡 Medium | Affects vertical imaging and vocal recording |
| Rear wall | 🟡 Medium | Contributes to room reverb buildup |
| Floor | 🟢 Lower | Often blocked by desk and equipment |
How to Do the Mirror Trick: Step-by-Step
The mirror test is the standard method recommended by acoustic treatment specialists for locating first reflection points [1][2]. You need two people, one mirror (a small bathroom mirror works fine), and about five minutes.
What you need:
- A flat mirror (any size — even a phone screen works in a pinch)
- A helper
- Painter's tape or sticky notes to mark the spots
- Your normal listening/mix position

Step 1: Sit in your mix position. Don't move from this spot for the whole test. Your ears need to stay exactly where they are when you're working.
Step 2: Start with the left side wall. Have your helper hold the mirror flat against the left wall, at roughly the same height as your tweeters (the small drivers on your studio monitors).
Step 3: Slide the mirror slowly from front to back. Your helper moves the mirror along the wall, keeping it flat and at tweeter height. You watch the mirror from your seat.
Step 4: Mark every spot where you see a speaker. The moment you can see either speaker reflected in the mirror, that's a first reflection point. Mark it with tape. Keep moving — there are two points per side wall (one from each speaker) [3].
Step 5: Repeat for the right wall. Same process, same logic.
Step 6: Do the ceiling. Lie the mirror flat and have your helper slide it across the ceiling above your desk area. Mark where you see the speakers reflected above you [1].
That's it. Six steps, five minutes, and you now know exactly where your panels need to go.
Where to Place Acoustic Treatment After the Mirror Test
Once you've marked your first reflection points, treatment placement becomes straightforward — with one important caveat.
Don't just treat the exact spot the mirror identified. Speakers aren't laser pointers. They radiate sound across a wide angle, and your head moves slightly while you work. Sound reflects from a zone around that mirror point, not a single inch of wall [1]. A panel that's too small or placed too precisely will underperform.
Practical placement rules:
- Side walls: Place absorption panels centered on the mirror marks. A 2' x 4' panel per reflection point is a solid starting size. If your budget allows, cover the full zone between the two marks on each wall.
- Ceiling: A ceiling cloud — a large horizontal panel suspended above your mix desk — is the standard solution. It covers both the left and right speaker ceiling reflection points in one piece.
- Panel thickness matters: Thinner panels (1–2 inches) only absorb high frequencies. For meaningful mid-frequency control, go 4 inches thick or use panels with an air gap behind them.
One common mistake: treating only the side walls and ignoring the ceiling. The ceiling reflection point sits directly above your microphone when you're recording vocals, which smears the sound before it even hits your mic. If you care about recording studio-quality vocals, the ceiling cloud is non-negotiable.
What about diffusion? Skip it for side wall first reflections. Research indicates that diffusion at these positions can actually reduce clarity rather than improve it — absorption or angled deflection are the better choices here [3].
For a deeper look at the full acoustic treatment picture, the complete guide to acoustic treatment for home studios covers bass traps, diffusion placement, and room modes in detail.
Common Mistakes That Kill Your Treatment Results
Even with perfect panel placement, a few easy mistakes will undercut your results.
Treating too small an area. The mirror shows you the center of the reflection zone, not its full extent. Go bigger than you think you need.
Using thin foam only. Those egg-crate foam tiles you see everywhere? They barely touch frequencies below 2 kHz. They look like acoustic treatment but don't perform like it. Proper broadband panels with dense rockwool or rigid fiberglass make a real difference.
Skipping the far-speaker reflection. Most people find the near-speaker reflection point and stop. But each wall has two points — one from each monitor [3]. Missing the second point leaves a gap in your treatment.
Ignoring monitor placement. Acoustic treatment and studio monitor placement work together. If your monitors are pushed into corners or too close to the front wall, you're creating new reflection problems that panels alone can't fix.
Interactive Tool: First Reflection Point Finder
Use the calculator below to estimate where your first reflection points fall based on your room and speaker dimensions.
First Reflection Point Calculator
Enter your room and speaker setup to estimate reflection point distances from the front wall.
FAQ: First Reflection Points Acoustic Treatment
What is a first reflection point in a home studio?
A first reflection point is the location on a wall, ceiling, or floor where sound from a studio monitor takes its shortest bounce path to the listener's ears. These early reflections arrive within milliseconds of the direct signal and can color the sound you hear at the mix position.
Do I need to treat first reflection points if I use headphones?
No — headphones bypass room acoustics entirely. First reflection point treatment only matters when you're monitoring through speakers. If you mix primarily on studio headphones, room treatment is less critical, though it still helps with recording.
How many first reflection points does a typical studio have?
At minimum, six: two per side wall (one from each speaker), one or two on the ceiling, and potentially one on the rear wall. The side walls are the highest priority [1][3].
Can I use the mirror trick alone, or do I need a helper?
A helper makes it much easier, but you can do it solo. Hold the mirror against the wall with one hand, sit at your mix position, and lean forward to check the reflection. It's awkward but workable for a quick check.
What's the best material for treating first reflection points?
Dense, rigid fiberglass or rockwool (mineral wool) panels, at least 2–4 inches thick, are the most effective broadband absorbers. Thin foam tiles only absorb high frequencies and won't address the mid-range coloration that first reflections cause.
Does treating first reflection points fix bass problems?
No. Bass buildup in room corners and low-frequency room modes require bass traps — a separate treatment. First reflection point acoustic treatment addresses mid and high-frequency early reflections, not low-end issues.
How big should my absorption panels be?
Bigger than you think. A 2' x 4' panel per reflection zone is a reasonable minimum. Because speakers radiate across a wide angle and your head moves, the reflection zone is larger than the single point the mirror identifies [1].
Should I use diffusion on my side walls instead of absorption?
Not for first reflections. Research indicates that diffusion at sidewall first reflection positions can reduce clarity and speech intelligibility. Absorption or angled deflection is the better approach for these surfaces [3].
Will treating first reflection points make my room sound dead?
No — if you treat only the first reflection points, the room will still have natural reverb from other surfaces. A reflection-free zone at the mix position actually makes the room feel more controlled and professional, not dead [2].
How do I know if my treatment is working?
The most immediate sign is improved stereo imaging — the left-right soundstage will feel wider and more defined. You may also notice that sounds are easier to place in a mix, and that your mixes translate better to other playback systems.
Conclusion
Finding your first reflection points takes five minutes and a mirror. Treating them is the single highest-impact acoustic upgrade you can make in a home studio — more impactful than a better microphone, more impactful than a more expensive audio interface.
Your next steps:
- Grab a mirror and a friend, and run the mirror test on both side walls and your ceiling today
- Mark every point where you see a speaker reflected — remember, two points per side wall
- Source broadband absorption panels (at least 2–4 inches thick) sized to cover the full reflection zone, not just the exact mirror point
- Mount side wall panels first, then add a ceiling cloud above your mix desk
- Check out the complete acoustic treatment guide for home studios for the next layer of room treatment
Your monitors can only tell you the truth if your room lets them. Fix the first reflections, and everything else — your EQ decisions, your mix balance, your vocal recordings — gets easier from that point on.
References
[1] The Producers Guide To First Reflection Points Mirror Test Included - https://audiosilk.com/blogs/blog/the-producers-guide-to-first-reflection-points-mirror-test-included
[2] Early Reflection Points - https://www.gikacoustics.com/blogs/knowledge-base/early-reflection-points
[3] The Room Acoustics Series Reflecting On Sidewall First Reflections - https://pmamagazine.org/the-room-acoustics-series-reflecting-on-sidewall-first-reflections/
[4] Early Reflections 101 - https://acousticfrontiers.com/blogs/articles/early-reflections-101