Your mixes sound great in your headphones. Then you play them in the car and the bass is a muddy mess. That's not your fault—it's your room. Untreated rooms lie to you, especially in the low end, and no amount of expensive gear will fix what bad acoustics break. This Bass Traps and Acoustic Treatment DIY Guide for Home Studios walks you through building effective bass traps and treating your space without spending thousands, using materials you can grab at the hardware store and strategies that work in bedrooms, basements, and spare rooms.
Key Takeaways
- Bass traps need minimum 25cm (10 inches) depth to absorb low frequencies effectively—thinner panels won't touch the bass problems causing your mix issues
- Corner placement is non-negotiable because bass energy builds up most in room corners, making them 3-4x more effective than wall-mounted positions
- Rockwool (mineral wool) at 40-80kg/m³ density offers the best DIY performance-to-cost ratio for bass absorption, outperforming acoustic foam significantly
- Start with 4 corner traps first (one trap between monitors, 2-3 at back wall, one front corner) before adding wall panels—this sequence delivers the biggest improvement fastest
- Aim for 40-60% wall coverage total across all treatments to control reflections without making your room sound unnaturally dead
- Target RT60 of 0.2-0.4 seconds in bass frequencies indicates successful treatment—you can measure this with free room analysis software
- Budget $200-400 for effective DIY treatment in a typical bedroom studio, compared to $1,500+ for commercial acoustic products
- Test before and after with measurement tools like Room EQ Wizard (free) to verify improvements rather than guessing
Quick Answer

Bass traps and acoustic treatment transform home studios by controlling low-frequency buildup and reflections that muddy your mixes and distort what you hear through your studio monitors. DIY bass traps built with rockwool insulation (60kg/m³ density, minimum 25cm deep) placed in room corners cost $200-400 for a bedroom studio and deliver professional results when combined with strategic panel placement covering 40-60% of wall surfaces[1][4]. Start with corner bass traps first—they address the biggest acoustic problems—then add first reflection point panels and ceiling treatment as budget allows.
Why Bass Traps Matter More Than You Think in Home Studios
Bass traps are the single most important acoustic treatment for mixing and production work. Period. They control the low-frequency room modes—those standing waves that make certain bass notes boom while others disappear—that turn your room into an unreliable listening environment[4].
Here's what happens without bass traps: your room has natural resonant frequencies determined by its dimensions. A typical 3m x 4m bedroom has strong modes around 40Hz, 57Hz, and 85Hz. When you play music, those frequencies build up in corners and against walls, creating peaks that are 10-15dB louder than other frequencies. Your brain compensates by turning down bass in your mix. Then you play that mix anywhere else and it sounds thin and weak.
Bass energy accumulates in corners because that's where all three room dimensions meet, creating maximum pressure buildup[4]. A bass trap in a corner can be 3-4x more effective than the same trap mounted flat against a wall. This is why the Bass Traps and Acoustic Treatment DIY Guide for 2026 Home Studios prioritizes corner placement above everything else.
What bass traps actually do
- Absorb low frequencies (typically 40-250Hz) that acoustic foam panels can't touch
- Reduce room mode peaks and nulls that create uneven bass response
- Decrease overall reverb time in the low end, tightening bass and kick drum clarity
- Improve stereo imaging by reducing bass-frequency reflections that smear the soundstage
- Enable accurate mixing decisions because you hear what's actually in your track, not room distortion
The difference between a treated and untreated room isn't subtle. It's the difference between mixing blind and mixing with your eyes open.
What Materials Work Best for DIY Bass Traps (And What to Avoid)
Rockwool (mineral wool) insulation is the DIY champion. Specifically, you want density between 40-80kg/m³ for optimal bass absorption[1]. This material is affordable, fire-resistant, easy to work with, and performs nearly identically to expensive studio-grade acoustic products.
Effective materials ranked by performance:
- Mineral wool / Rockwool (40-80kg/m³) - Best overall choice, $30-50 per trap
- Open-cell polyurethane foam (30-40kg/m³) - Good alternative, slightly more expensive
- Fiberglass insulation (similar density) - Effective but irritating to work with, requires careful sealing
- High-density acoustic foam (80kg/m³+) - Works but costs 3-5x more than rockwool for same performance
Materials that don't work for bass:
- Standard egg-crate foam (too thin, wrong density)
- Blankets, curtains, or moving blankets (ineffective below 500Hz)
- Cardboard egg cartons (internet myth—these do nothing)
- Thin acoustic foam panels under 5cm (only treat high frequencies)
Depth matters more than you think
An 8-inch (200mm) mineral wool trap is effective above 50Hz. A 12-inch (300mm) trap covers down to 25Hz[2]. For home studio work, 25cm (10 inches) minimum depth hits the sweet spot between effectiveness and practicality[1]. Deeper is better, but you'll see diminishing returns past 30cm unless you're treating a professional mixing room.
The density matters because it determines how sound energy converts to heat as it passes through the material. Too light (under 30kg/m³) and bass frequencies pass right through. Too dense (over 100kg/m³) and sound reflects off the surface instead of entering the material.
How to Build Corner Bass Traps for Under $50 Each
Building effective bass traps is simpler than most DIY projects. You need basic tools, an afternoon, and materials from any hardware store. This Bass Traps and Acoustic Treatment DIY Guide for 2026 Home Studios approach uses the recommended 1m width by 2m height dimensions that work in most home studios[1].
Materials needed per trap:
- Rockwool insulation (60kg/m³ density, 25cm thick) - $25-35
- 1x4 lumber for frame (8 feet total) - $8-12
- Acoustically transparent fabric (burlap, speaker cloth, or breathable upholstery fabric) - $10-15
- Wood screws (1.5-inch) - $3
- Staple gun and staples - $2
- Optional: corner brackets for easier assembly - $4
Total per trap: $48-71
Step-by-step construction process:
- Cut frame pieces: Four pieces of 1x4 lumber—two at 2m length, two at 1m length (adjust for actual lumber thickness)
- Assemble rectangular frame: Screw corners together using 2-3 screws per joint, or use corner brackets for faster assembly
- Cut rockwool to size: Measure interior frame dimensions and cut insulation to fit snugly (wear gloves, long sleeves, and mask—this stuff irritates skin)
- Insert insulation: Press rockwool into frame—it should fit tightly without gaps
- Stretch fabric over front: Pull fabric taut across one side and staple every 2-3 inches around perimeter, folding corners neatly
- Optional back covering: Staple fabric or thin plywood to back if trap will be visible from behind
Common mistake: Using regular household fabric that's too dense. Your fabric needs to be acoustically transparent—you should be able to blow air through it easily. Dense fabric reflects high frequencies and reduces trap effectiveness.
The frame doesn't need to be perfect. Slight gaps won't ruin performance. The rockwool does the work; the frame just holds it in place and makes it look intentional instead of like insulation leaning against your wall.
Where to Place Bass Traps for Maximum Impact in Small Rooms
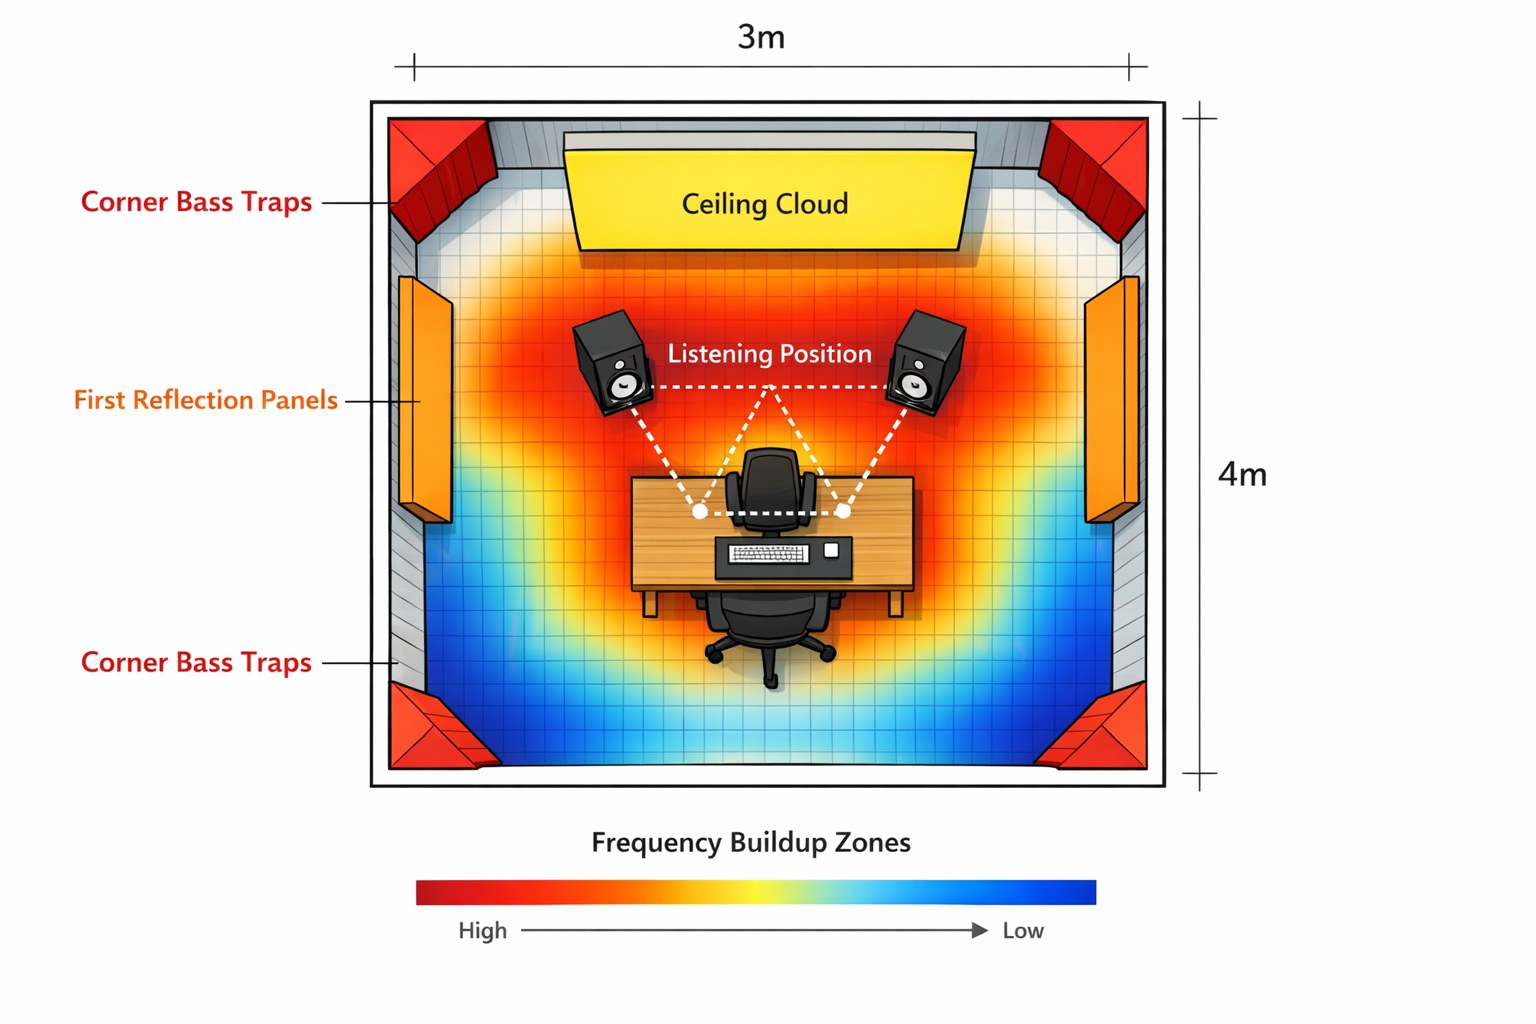
Placement strategy matters more than the number of traps you build. One trap in the right location outperforms three traps in wrong positions. Start with corners, always[4].
Priority placement sequence (follow this order):
- Tri-corner behind listening position - Place one trap vertically in the corner directly behind where you sit, spanning floor to ceiling if possible
- Front corners beside monitors - One trap in each front corner on the side walls (not the wall where monitors sit)
- Ceiling-wall corners - Horizontal traps where ceiling meets front wall above monitors, or where ceiling meets back wall
- Wall-wall vertical corners - Any remaining vertical corners in the room
For small bedrooms (3m x 4m typical): Start with one trap in the back corner between your listening position and the wall, then add two traps at the back wall corners, then one in a front corner[1]. This four-trap setup addresses 70-80% of bass problems in most home studios.
Wall-mounting versus corner placement
Placement against walls with no air gap is most efficient for absorbing room mode frequencies where bass energy is highest[1]. But corners are still priority number one. If you're building flat panels for walls (rather than corner traps), mount them directly against the surface—air gaps behind bass traps don't improve low-frequency absorption the way they do for mid-range absorbers.
First reflection points (the spots on side walls where sound from your monitors bounces before reaching your ears) should get treatment after corner bass traps. These need thinner broadband panels (5-10cm) rather than thick bass traps. You can find first reflection points by having someone slide a mirror along the wall while you sit at your listening position—when you see the monitor in the mirror, that's a reflection point.
Target 40-60% wall coverage total across all your acoustic treatment[4]. More than 60% and your room starts sounding unnaturally dead—you want to control problems, not eliminate all reflections.
Testing Your Room Before and After Treatment
Guessing doesn't work. You need measurements. Room EQ Wizard (REW) is free software that shows exactly what your room is doing to your sound. Pair it with a $75 measurement microphone like the MiniDSP UMIK-1, and you have a professional room analysis system.
What to measure:
- Frequency response - Shows which bass frequencies are too loud or too quiet
- RT60 (reverberation time) - How long sound takes to decay by 60dB; target 0.2-0.4 seconds in bass frequencies for treated studios[1]
- Waterfall plot - Reveals which frequencies ring out too long
- Room modes - Identifies specific problematic frequencies based on room dimensions
Before treatment: Take measurements from your listening position. You'll typically see massive peaks and dips in the 40-200Hz range—variations of 15-20dB aren't unusual in untreated bedrooms. RT60 might be 0.6-1.0 seconds in the low end.
After treatment: The frequency response should smooth out significantly, with peaks reduced by 5-10dB and overall variation under 10dB across the bass range. RT60 should drop to 0.2-0.4 seconds. You won't achieve perfectly flat response—that requires extensive treatment and room correction—but you should see clear improvement.
The listening test
Measurements tell the technical story. Your ears tell the practical one. After installing bass traps:
- Bass should sound tighter and more defined - Individual bass notes become clearer instead of bleeding together
- Kick drums should punch rather than boom
- Stereo image should improve - You can pinpoint instrument positions more accurately
- Your mixes should translate better - Play them in your car, on headphones, on a Bluetooth speaker—they should sound more consistent
If you don't hear improvement, either placement is wrong or you need more traps. Don't assume four traps will solve everything in a particularly problematic room. Some spaces need 6-8 corner traps plus wall panels to reach acceptable performance.
Acoustic Panels vs Bass Traps: What to Build First on a Budget
This trips people up constantly. If you can only afford one type of treatment, choose based on what you're doing[4].
Build bass traps first if:
- You're mixing or mastering
- You work with bass-heavy genres (EDM, hip-hop, rock)
- You use studio monitors as your primary reference
- Your room sounds boomy or certain bass notes are way louder than others
Build acoustic panels first if:
- You're primarily recording vocals or acoustic instruments
- You hear obvious flutter echo (clap your hands—if you hear a metallic ringing, you have flutter echo)
- Your room is very small (under 2.5m x 3m) with hard parallel walls
- You're podcasting or doing voice work
The honest truth: most home studios need both. Bass traps control the low end. Thinner broadband panels (5-10cm rockwool) control mid and high-frequency reflections that cause the "boxy" sound and smear clarity.
Budget progression strategy:
- $200 budget: Build 4 corner bass traps
- $400 budget: Build 4 corner bass traps + 4 first-reflection-point panels (60cm x 120cm x 5cm)
- $600 budget: Build 6 corner bass traps + 6 wall panels + 1 ceiling cloud
- $800+ budget: Full treatment with 8+ bass traps, wall panels, ceiling clouds, and diffusion
Acoustic panels are easier and faster to build than bass traps because they're thinner and lighter. Same construction process, just use 5cm rockwool instead of 25cm. You can knock out four panels in an hour once you have your process down.
Common DIY Acoustic Treatment Mistakes (And How to Avoid Them)
Mistake #1: Using acoustic foam instead of rockwool for bass
Those pyramid foam panels look professional and they're everywhere online. They're also nearly useless for bass frequencies. Foam works for high frequencies only. A 5cm foam panel might absorb above 1kHz effectively, but it does almost nothing below 200Hz[2]. For the same money, rockwool outperforms foam by a massive margin in the frequencies that actually matter for mixing.
Mistake #2: Mounting bass traps with air gaps behind them
Air gaps help with mid-frequency absorption but don't improve bass trap performance. Mount bass traps directly against walls and into corners[1]. The air gap myth comes from quarter-wavelength absorber theory, which requires precise spacing and only works for narrow frequency ranges—not practical for broadband DIY traps.
Mistake #3: Over-treating the room
More isn't always better. Covering every surface makes your room sound dead and unnatural, which is just as bad for mixing as an untreated room. You lose the sense of space and depth that makes music feel alive. Stick to the 40-60% coverage guideline[4] and focus on problem areas rather than blanketing everything.
Mistake #4: Ignoring room modes and treating randomly
Room modes are mathematical—they're determined by your room dimensions. A 4m long room has a strong mode at 43Hz (speed of sound ÷ 2 × room length). Treating random spots won't address modes. Corners are where modes build up most, which is why systematic corner treatment works better than scattered panels.
Mistake #5: Expecting acoustic treatment to fix bad monitoring
Treatment helps your monitors perform better, but it won't turn bad speakers into good ones. If you're using computer speakers or cheap multimedia monitors, invest in proper studio monitors before spending heavily on treatment. Similarly, if your audio interface is noisy or your room has serious structural problems (paper-thin walls, major external noise), treatment won't solve those issues.
Mistake #6: Building traps too thin
A 10cm "bass trap" isn't a bass trap—it's a mid-range absorber. You need minimum 25cm depth to affect frequencies below 80Hz meaningfully[1]. Don't waste time and materials building thin traps and calling them bass traps. Build them right or build panels instead.
Advanced Tips: Broadband Traps and Hybrid Designs
Once you've nailed the basics, these refinements can squeeze out extra performance without adding much cost.
Broadband absorption approach: Most effective DIY bass traps function as broadband absorbers, addressing frequencies from low bass through high frequencies[2]. This is actually ideal for home studios because you get bass control plus some mid/high absorption in one unit. The thick rockwool naturally absorbs a wide frequency range.
Superchunk corner traps: Instead of flat panels in corners, cut rockwool into triangular chunks that fill the entire vertical corner from floor to ceiling. This maximizes absorption in the highest-pressure zone. Cut the rockwool at 45-degree angles to create a triangle that fits snugly into the corner, then wrap the exposed face with fabric. More effective than flat corner panels but uses more material.
Hybrid density traps: Layer different densities—put 60kg/m³ rockwool as the base layer (facing the corner) and 40kg/m³ as the outer layer (facing the room). The lower density outer layer absorbs higher frequencies more effectively while the dense inner layer handles bass. This creates a more even absorption curve across frequencies.
Straddling corners: Build traps that span across corners rather than fitting into them. A 60cm x 60cm panel mounted diagonally across a corner creates a large air cavity behind it, improving low-frequency absorption. Easier to build than superchunks and nearly as effective.
Budget Breakdown: What $300 Actually Buys You
Let's get specific about costs for a typical bedroom studio (3m x 4m):
$300 Basic Treatment Package:
4 Corner Bass Traps (1m x 2m x 25cm):
- Rockwool: $120 (4 panels @ $30 each)
- Lumber: $40
- Fabric: $50
- Hardware: $15
- Subtotal: $225
4 First Reflection Panels (60cm x 120cm x 5cm):
- Rockwool: $40
- Lumber: $20
- Fabric: $15
- Subtotal: $75
Total: $300
This package addresses the most critical acoustic problems in a small room: bass buildup in corners and early reflections from side walls. You'll hear tighter bass, clearer stereo imaging, and mixes that translate better to other systems.
$500 Complete Treatment Package:
Add to the $300 package:
- 2 additional corner bass traps: $100
- 1 ceiling cloud (120cm x 120cm x 10cm): $60
- Mounting hardware (brackets, screws): $40
Total: $500
This approaches professional treatment levels for a bedroom studio. The additional corner traps handle remaining bass issues, and the ceiling cloud controls overhead reflections that cause comb filtering.
Compare this to commercial acoustic treatment: pre-built bass traps run $150-300 each. A comparable commercial treatment package would cost $1,500-2,500. You're saving 70-80% by building it yourself, and the performance is virtually identical.
FAQ: Bass Traps and Acoustic Treatment for Home Studios
How many bass traps do I actually need?
Start with 4 corner bass traps in a typical bedroom studio (3m x 4m). Measure the results, then add 2-4 more if needed. Larger rooms or rooms with serious bass problems may need 8-12 traps total. There's no universal number—it depends on room size, shape, and how critical your monitoring needs to be.
Can I use regular fiberglass insulation instead of rockwool?
Yes, but it's messier and more irritating to work with. Fiberglass at similar density (40-80kg/m³) performs nearly identically to rockwool for acoustic absorption. You must seal it completely in fabric to prevent fibers from escaping into your room air. Rockwool is safer and easier for DIY projects.
Do bass traps work if I only use headphones?
Bass traps don't help your headphone sound, but they dramatically improve the room for recording. If you're tracking vocals or acoustic instruments, bass traps reduce room resonances that muddy your recordings. If you literally never use monitors and never record anything, skip the bass traps.
Should bass traps go in front of or behind the fabric?
The rockwool goes behind the fabric. The fabric is purely cosmetic and protective—it needs to be acoustically transparent so sound can reach the absorption material. Never put anything dense or reflective in front of your bass traps.
How do I know if my room needs more treatment after installing bass traps?
Measure with Room EQ Wizard. If you still see frequency response variations over 10dB in the bass range, or RT60 over 0.4 seconds, you need more treatment. If measurements look good but mixes still don't translate well, the problem might be monitoring position, speaker quality, or room dimensions rather than needing more traps.
Can I make bass traps too thick?
Practically, no. Thicker is better for low-frequency absorption, but you hit diminishing returns past 30cm for DIY broadband traps. The real limitation is room space—a 40cm thick trap in a small bedroom eats up valuable square footage. Stick with 25-30cm as the sweet spot.
What's the difference between bass traps and acoustic panels?
Thickness and purpose. Bass traps are thick (25cm+) and target low frequencies (40-250Hz). Acoustic panels are thinner (5-10cm) and target mid and high frequencies (250Hz-10kHz+). Both use similar materials, but the depth determines which frequencies they absorb effectively.
Do I need to treat the ceiling?
Yes, eventually. Ceiling reflections cause comb filtering that affects the mid-range clarity. A ceiling cloud (large panel suspended above your listening position) should be your third or fourth priority, after corner bass traps and first reflection point panels. It's not as critical as corner treatment but makes a noticeable difference.
Will acoustic treatment stop sound from leaving my room?
No. Acoustic treatment controls sound inside the room—it doesn't provide soundproofing. Soundproofing requires mass, isolation, and sealed air gaps (think double walls, resilient channels, mass-loaded vinyl). Treatment and soundproofing are completely different problems requiring different solutions.
Can I use moving blankets or mattress foam instead of rockwool?
Moving blankets provide minimal absorption, mainly above 500Hz, and they're not effective for bass. Mattress foam is too dense and reflects rather than absorbs. Neither is a real substitute for proper acoustic materials. If budget is extremely tight, spend $200 on four proper rockwool bass traps rather than $100 on ineffective alternatives.
How long does DIY acoustic treatment last?
Indefinitely if built properly. Rockwool doesn't degrade, compress, or lose effectiveness over time. The fabric might fade or get dusty, but the acoustic performance remains constant. Commercial foam panels can deteriorate after 5-10 years, but mineral wool is essentially permanent.
Should I hire a professional or DIY my acoustic treatment?
DIY saves 70-80% compared to professional installation and delivers the same acoustic results if you follow proven designs. Hire a professional if you need custom solutions for an unusual room, if you're building a commercial studio, or if you want room analysis and treatment design services. For a home bedroom studio, DIY is absolutely the right choice.
The Bottom Line: Build It, Measure It, Mix With Confidence
Acoustic treatment is one of those investments that pays dividends on every single session. Every mix you make in a treated room is a more honest mix—one where your decisions actually carry over to the real world instead of getting filtered through your room's lies.
The path forward is straightforward. Start with four corner bass traps built from 60kg/m³ rockwool at 25cm depth. Spend an afternoon and around $200. Measure your room with REW before and after. Listen to the difference. Then expand from there—first reflection panels, a ceiling cloud, additional corner treatment—as budget and motivation allow.
You don't need to solve everything at once. A single well-placed bass trap in the right corner will outperform a room full of thin foam panels. Prioritize depth over coverage, corners over walls, and measurement over guesswork.
The gear in your studio is only as useful as the room lets it be. A $150 pair of monitors in a well-treated room will teach you more about your music than a $1,500 pair in an untreated bedroom. That's the uncomfortable truth of home studio acoustics—and it's also the most encouraging one, because rockwool and lumber are within reach of almost any budget.
Build the traps. Trust the process. Your mixes will thank you.